¶ Presentation
RECALBOX RGB JAMMA 1 and 2: enjoy the whole of Recalbox on your JAMMA cabinet!
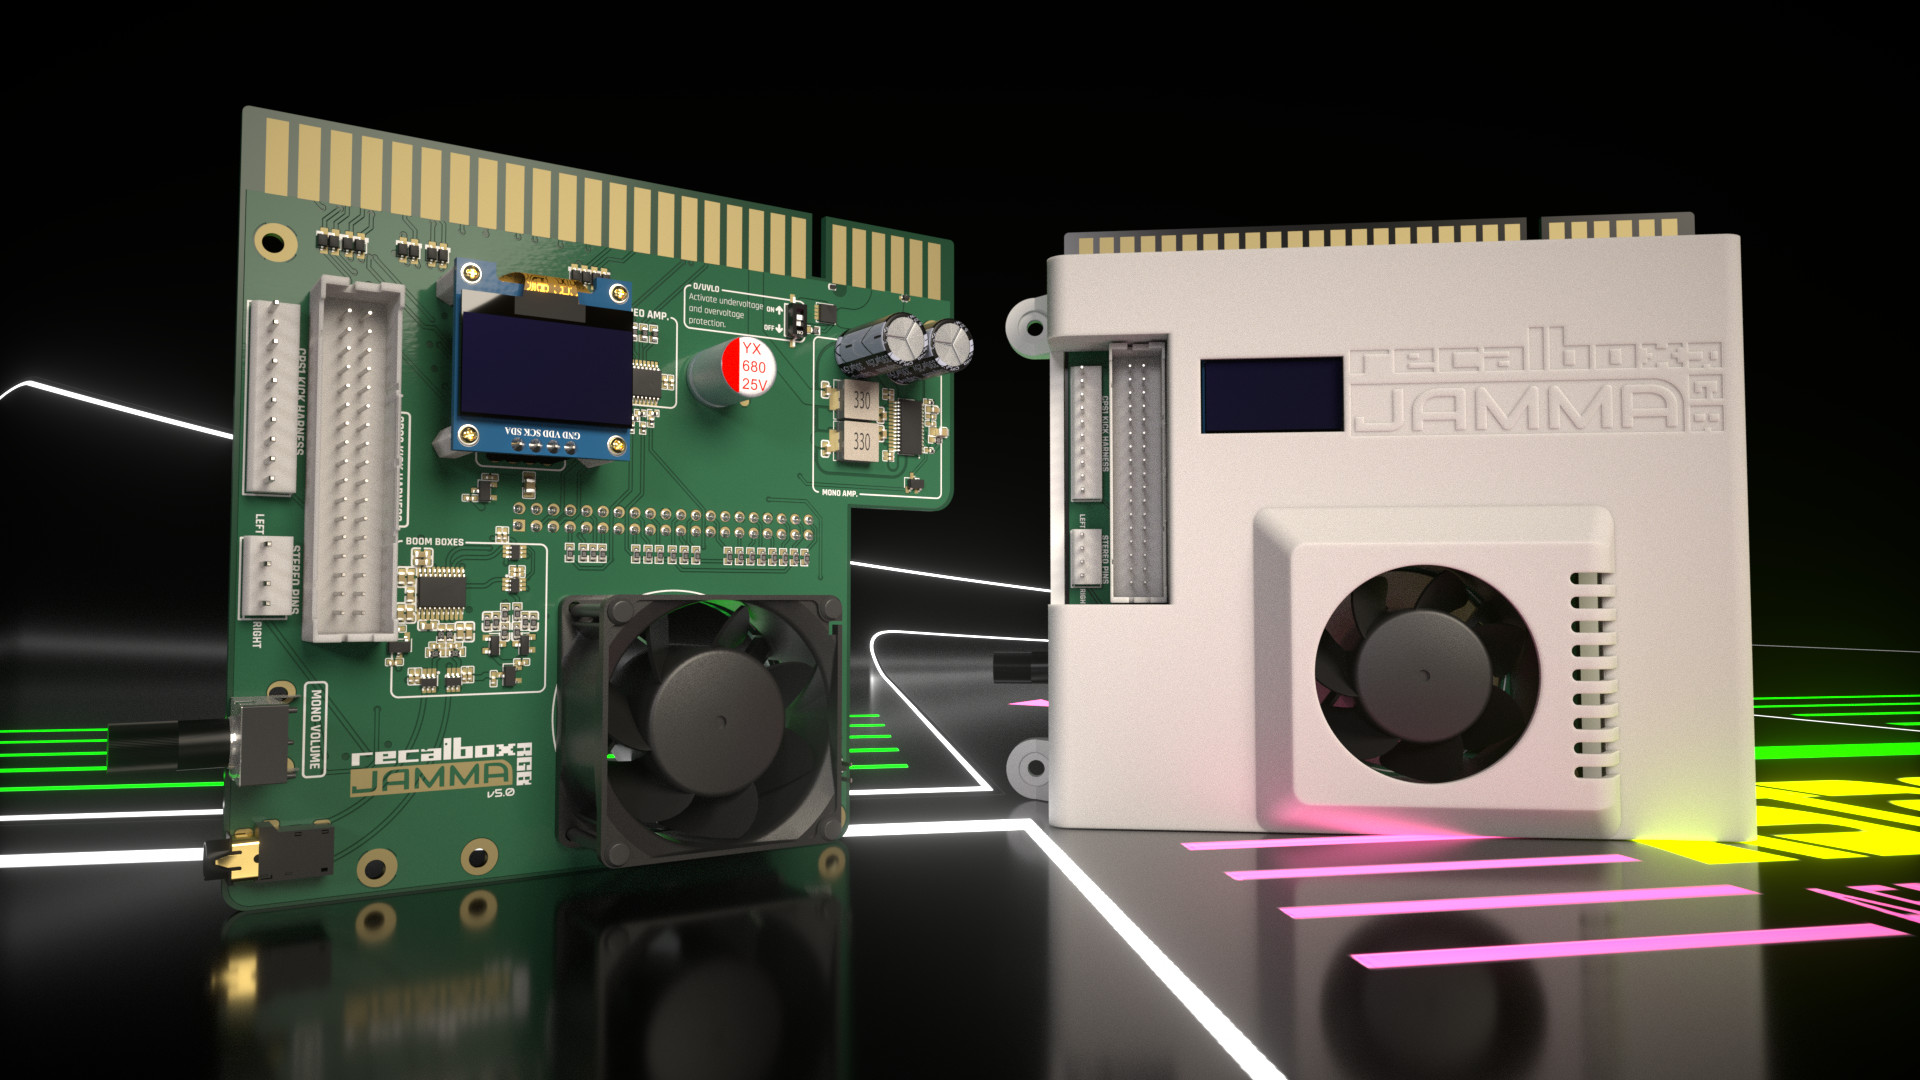
Before going any further, what is JAMMA? Introduced in the 80s, JAMMA standardized the connection of the various signals inside arcade machines. Changing games on an arcade machine suddenly became child's play.
This format has survived to the present day, and is still used in a large number of "old-fashioned" CRT arcade machines. If you don't have a JAMMA machine, and don't plan to buy one in the near future, the Recalbox RGB JAMMA is not for you.
On the other hand, its big brother the Recalbox RGB DUAL 2, which lets you experience the thrill of gaming on your CRT TV, is available from our store. (The first generation, Recalbox RGB DUAL, covers the Raspberry Pi 4/3/Zero 2.)
¶ Recalbox RGB JAMMA 2
Recalbox 10 is required as a minimum for the Recalbox RGB JAMMA 2 to work. Specifically for RGB JAMMA 2 Rev E and above, version 10.0.4 is required as a minimum.
Download the Recalbox image for the Raspberry Pi 5 from the official download page, then follow the installation guide.
The complete kit is available from the store: Recalbox RGB JAMMA 2 — complete kit.
¶ Preparation
The Recalbox RGB JAMMA pinout is JAMMA, JAMMA+ and CHAMMA compatible.
.png)
Buttons are named according to the JAMMA standard:
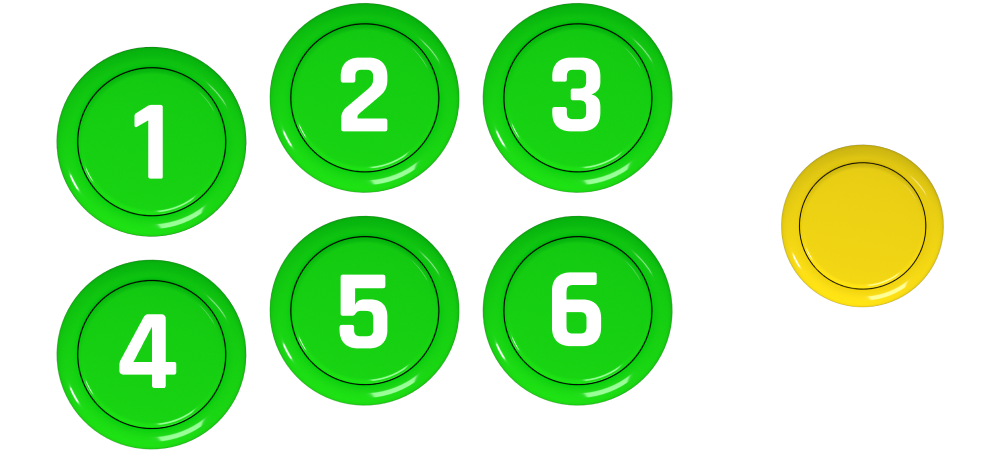
The TEST and SERVICE buttons are located inside your cabinet, often directly on the power supply.
¶ Installation in the cabinet
¶ Assembly
¶ Pi + Recalbox RGB JAMMA
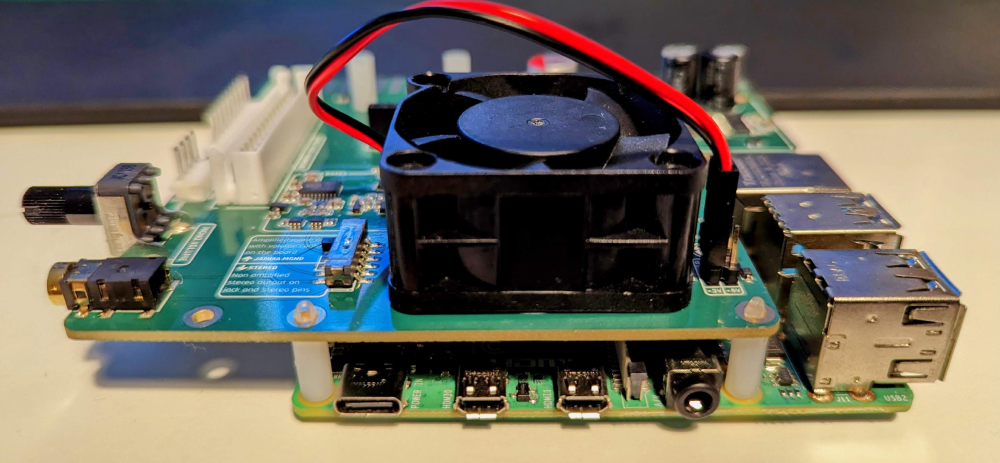
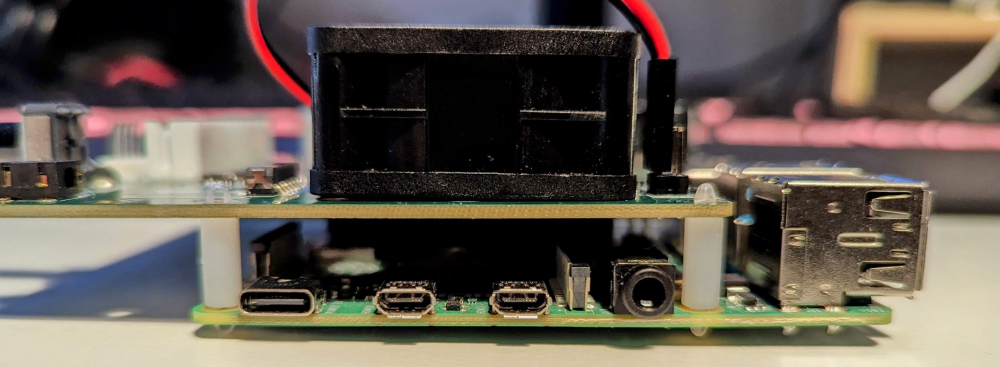
Clip the Raspberry Pi into the Recalbox RGB JAMMA, and clip the supplied plastic spacers onto the two PCBs.
¶ Fan
The Recalbox RGB JAMMA fan is used to cool the Raspberry Pi. It has been tested to cool the Raspberry Pi as efficiently as possible, whether bare or in the official case. It replaces the fan on your Raspberry Pi.
Use the +5V and GND pins for maximum power, or +3V and GND to limit fan noise.
.png)
Compatible fans:
- size 40x40x20 mm or 40x40x10 mm
- 5 V
- 1 W max (0.3 W is enough)
- M3 screws and nuts
If you install your own fan, position it so that it blows air downwards.
Don't add a fan directly on the Raspberry Pi: the airflow from the Recalbox RGB JAMMA cools the whole system.
¶ Case (optional)
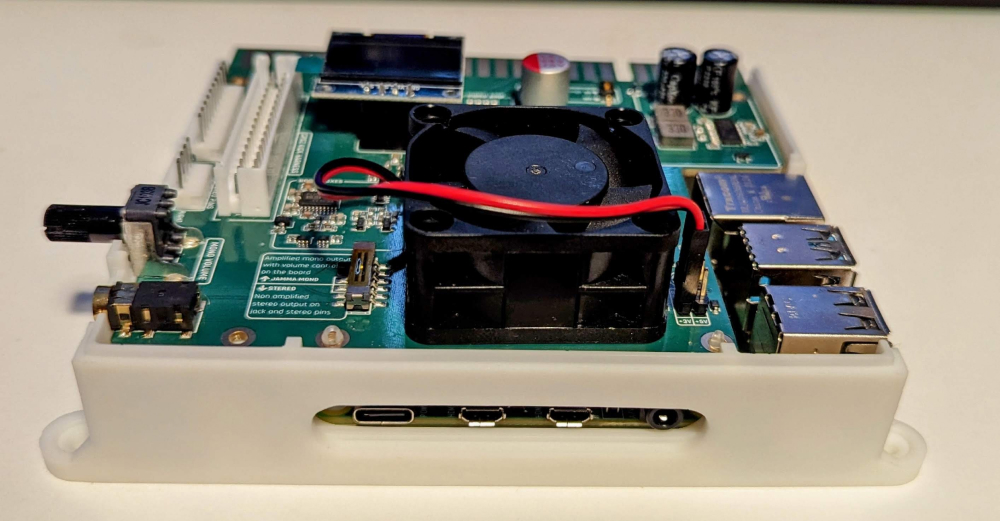
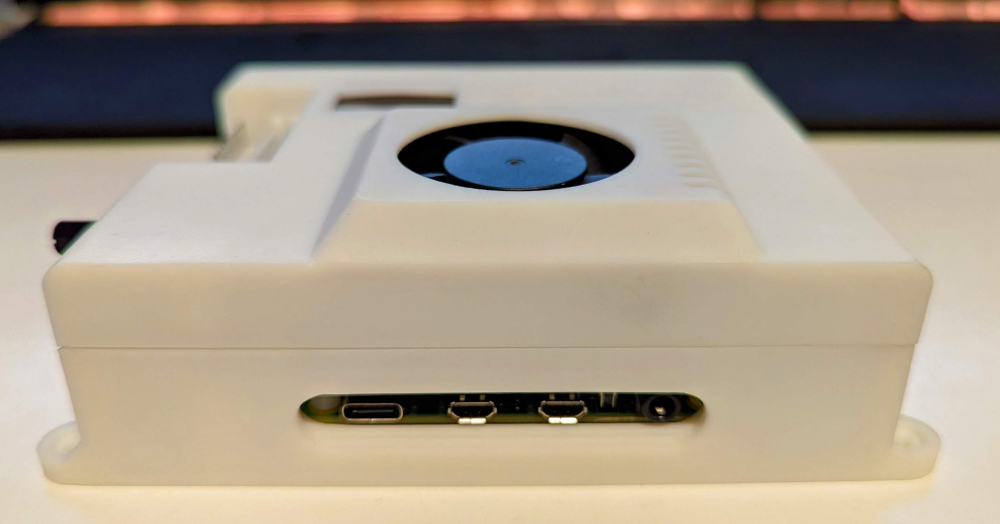
Once the Raspberry Pi has been clipped onto the Recalbox RGB JAMMA, all you have to do is position it in the case and close it using the M2.5x15 mm screws supplied with the case.
¶ Power supply voltage
The power supply voltage for the Recalbox RGB JAMMA + Raspberry Pi 5 should be between 5.05 V and 5.20 V. If your cabinet is already set up to be compatible with most PCBs / multi systems, no problem: you can run the Recalbox RGB JAMMA as is.
A popup will warn you during use if the voltage drops too low as the Raspberry Pi ramps up.
If this popup appears, you'll need to raise your voltage by a few millivolts (between 5.05 V and 5.2 V, we recommend 5.1 V). This is done with a potentiometer located on your power supply. Make sure you are well informed about your power supply, well equipped (plastic or ceramic screwdriver), or have someone help you if you are a beginner and not sure of yourself.
¶ Image installation
- Launch Raspberry Pi Imager, select your Raspberry Pi model, then select Recalbox in the Emulation and Game OS section. Start copying.
- Insert the SD card into your Raspberry Pi, connect your Recalbox RGB JAMMA to your JAMMA harness, and power up your cabinet!
The installation and detection of the Recalbox RGB JAMMA start automatically.
¶ VIDEO
¶ Pixel Perfect 15 kHz
All games, whether arcade or console, are launched in their original resolution and frequency. Some games have "exotic" resolutions, such as Mortal Kombat (400x254@54.815170Hz) or R-Type (384x256@55.017606Hz). The video modes generated by the Recalbox RGB JAMMA come as close as possible to these original resolutions, so some games may require an adjustment on your arcade monitor.
¶ Super Resolution
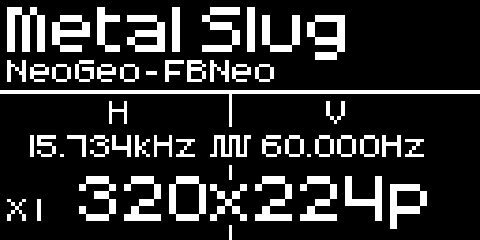
To produce the best possible video signal, it is sometimes necessary to use super resolutions, which multiply the horizontal resolution by an integer. The Recalbox RGB JAMMA screen shows the horizontal multiplication factor when a super resolution is active (SUPERREZ MULTIPLIER option).
¶ 31 kHz support / JVS / Naomi
If you have a 31 kHz screen (a NUC + jammafier, for example), you need to activate 31 kHz mode so that the video signal switches to 31 kHz for all menus and games.
However, Recalbox defaults to 15 kHz, so you have two options:
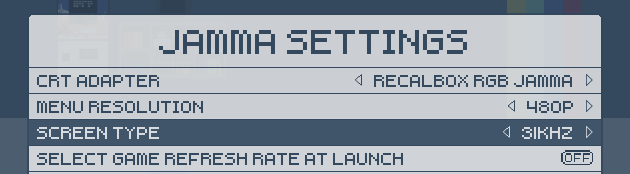
- connect the Recalbox RGB JAMMA to a 15 kHz cabinet once and change the
SCREEN TYPEoption in the menu;
- plug the SD card into your PC and write the line
options.screen.type = 3in theRECALBOX/crt/recalbox-crt-options.cfgfile.
The values of
options.screen.typeare:1= 15 kHz,2= multisync 15/25 kHz,3= 31 kHz,4= multisync 15/31 kHz,5= tri-frequency.
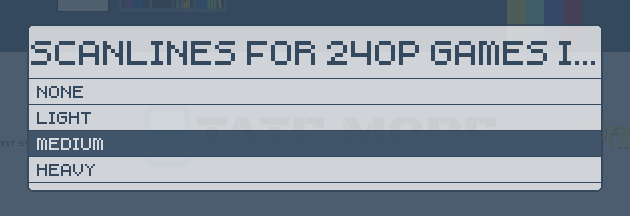
When you launch a 15 kHz game in 480p, the game lines are simply doubled. You can enable the 240P GRID option to simulate the scanlines of a 240p display. Three settings give you more or less pronounced scanlines:
¶ Multisync support
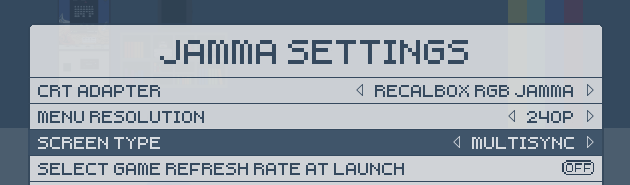
Multisync mode suits monitor chassis that detect the frequency of the video signal and switch modes accordingly. 240p games are launched at 15 kHz and 480p games at 31 kHz. So you get ALL games in their original resolutions!
Multisync is enabled directly from the SCREEN TYPE option of the RECALBOX RGB JAMMA SETTINGS menu:
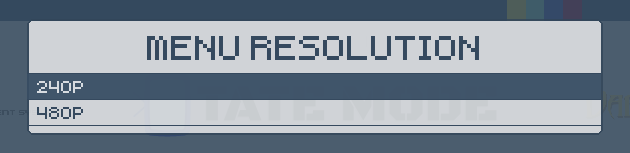
Once multisync mode is selected, you can choose the menu resolution (MENU RESOLUTION) to suit your habits, and to limit the number of mode switches on your cabinet:
- choose 240p if you play 15 kHz games more often than 31 kHz games;
- choose 480p if you play 31 kHz games more often than 15 kHz games.
Check that your monitor chassis is compatible with multisync mode before enabling it.
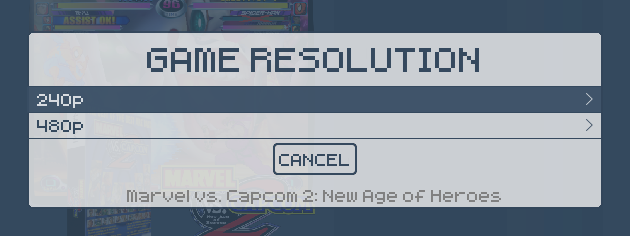
By default, Atomiswave, Naomi and Dreamcast games launch in 480p. But some games of that era were upscaled on those platforms, and some of you might want to discover them in 240p  To do so, enable the
 SELECT GAME RESOLUTION AT LAUNCH option in the menu, and choose the resolution of each game before launching it!

Each time a game is launched, the resolution can be selected:
¶ TATE mode (vertical)
Enabling TATE mode couldn't be easier: it's all in the TATE SETTINGS menu (START → TATE SETTINGS).
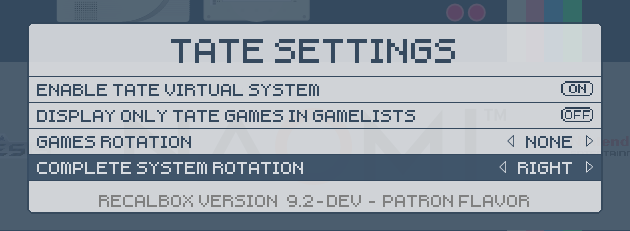
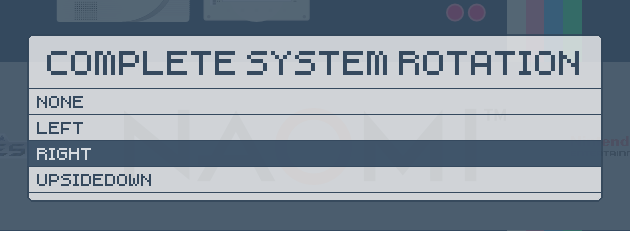
Select the rotation direction (RIGHT = 90° clockwise). Once the rotation is selected, the frontend reloads and the screen is rotated!
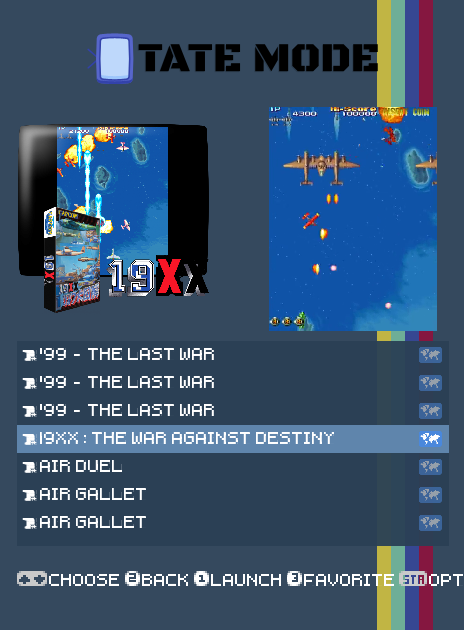
You can display only vertical games with the DISPLAY ONLY TATE GAMES IN GAMELISTS option.
Remember to scrape your games so that Recalbox can detect vertical games in the menus!
If your theme is compatible, it will automatically adapt to the vertical screen layout!
¶ Calibration
Here are the steps to calibrate your CRT screen on Recalbox using the Retroarch menu.
You must use a "Libretro" emulator to access the Retroarch menu. This guide will not work with so-called "standalone" emulators, as they have no function to calibrate your CRT screen.
- Run your game, then use the
START+B2shortcut on your panel to access the Retroarch menu and select the "CRT Calibration" menu (in "Quick Menu").
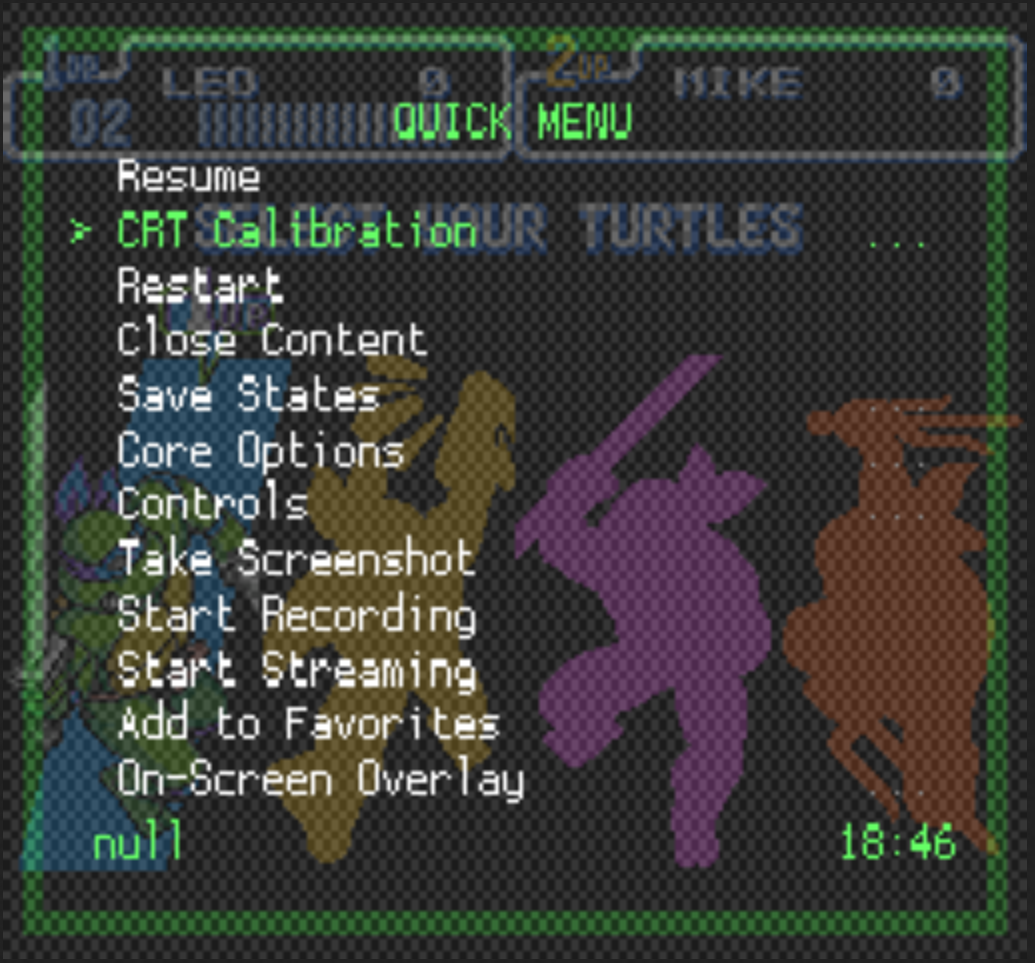
- In this menu, you have several functions:
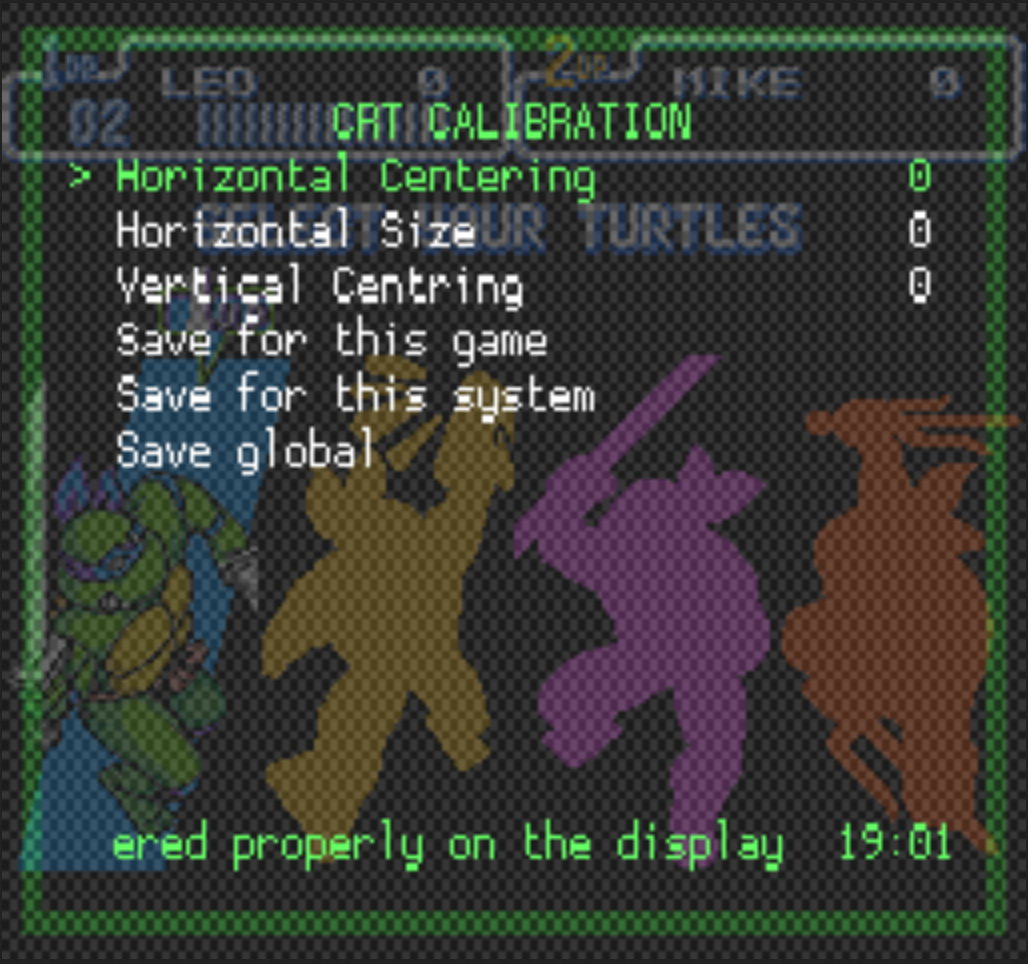
- Horizontal Centering: positions the game screen horizontally.
- Horizontal Size: changes the width of the image.
- Vertical Centering: positions the game screen vertically.
These settings can be changed with the LEFT and RIGHT directions of your joystick. It is not possible to change the height of the image; this setting can only be adjusted directly on your screen.
- Save for this game: saves the settings for the game being played.
- Save for this system: saves the settings for all games on the console using this core.
- Save global: saves the settings for all of Retroarch, regardless of the emulator used.
Press B1 to confirm the save. Once configured, you can return to your game using the START + B2 shortcut again.
The RECALBOX RGB JAMMA SETTINGS menu also offers a FRONTEND SCREEN CALIBRATION entry, which calibrates the Recalbox menu and the standalone emulators.
¶ Set your GameCube games to 60 Hz
Just like on the original Nintendo GameCube console, it was possible to force a game's frequency to 60 Hz by holding down the B button on the controller when starting the console.
This rule also applies on Recalbox: once a game has started, hold down the B4 button while the GameCube boots.
Not all games can be forced to 60 Hz using this method. Each game needs to be tested individually.
¶ CONTROLS
¶ JAMMA + JAMMA+ + CHAMMA
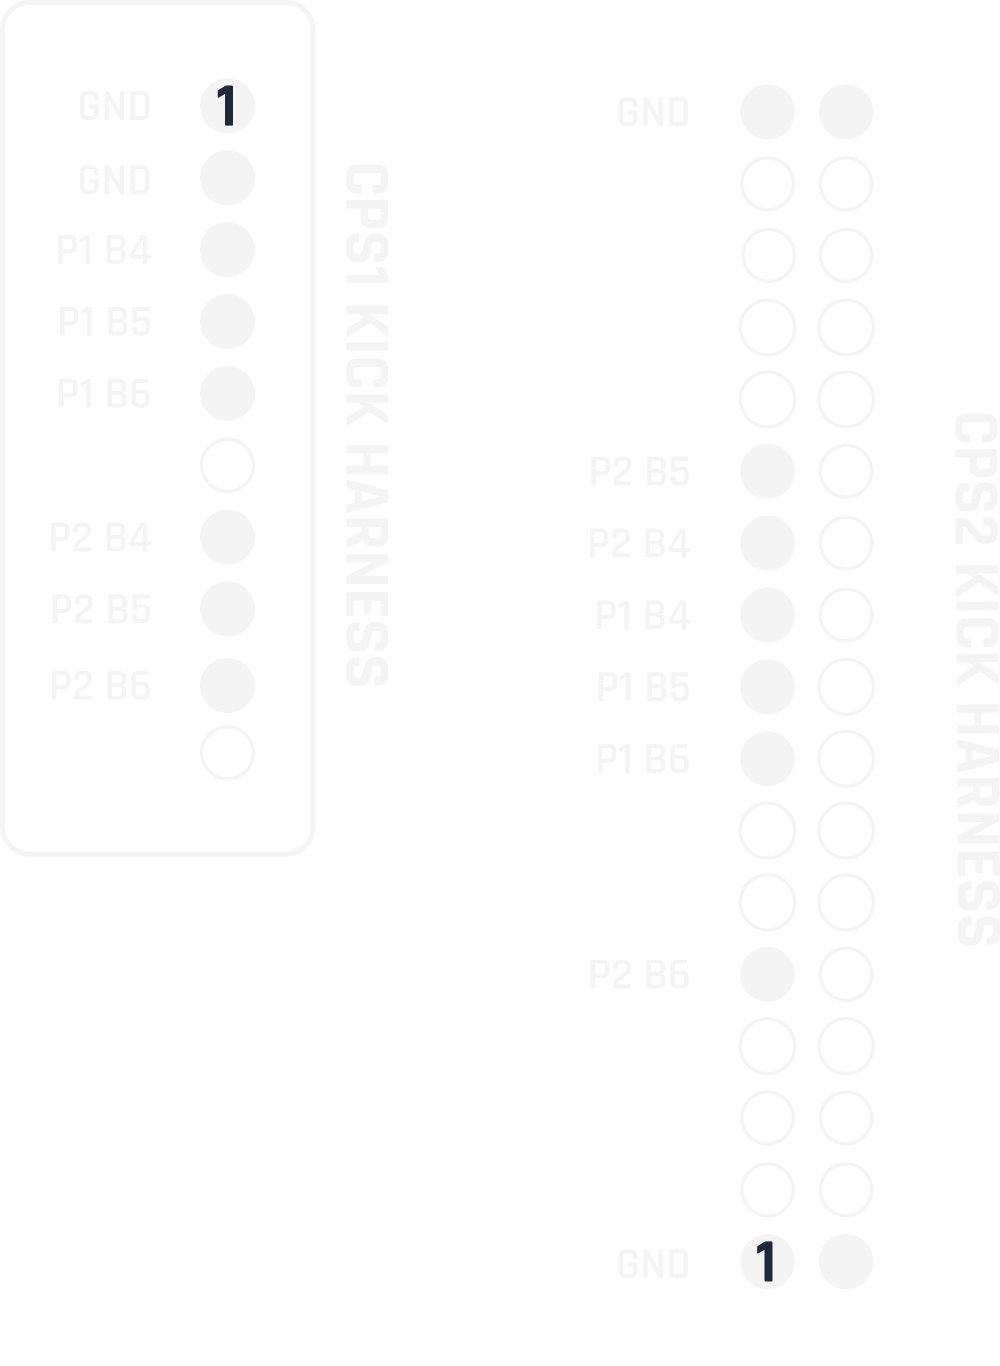
Every cabinet has its own configuration. The Recalbox RGB JAMMA automatically supports the different button combinations on the JAMMA harness or on the kick harness. CPS1 and CPS2 kick harnesses are interchangeable without any configuration.
JAMMA and kick harness configuration
| Buttons on JAMMA | Buttons on kick harness |
|---|---|
| 1 2 | |
| 1 2 3 | |
| 1 2 3 | 4 |
| 1 2 3 | 4 5 |
| 1 2 3 | 4 5 6 |
| 1 2 3 4 | 5 6 |
JAMMA+ and kick harness configuration
| Buttons on JAMMA | Buttons on kick harness |
|---|---|
| 1 2 3 4 5 | 6 |
CHAMMA and kick harness configuration
| Buttons on JAMMA | Buttons on kick harness |
|---|---|
| 1 2 3 4 5 6 |
The number of buttons on your panel is set with the PANEL TYPE option.
¶ Ground on pin 27/E — CHAMMA
If you are on CHAMMA (with button 6 on the JAMMA harness), you will need to disable the PIN E/27 AS GND option.

¶ CPS1 and CPS2 kick harness
¶ Input lag
The input lag of the Recalbox RGB JAMMA is extremely low: less than one millisecond. However, the overall latency of games and systems is affected by things other than input lag.
Two options are available in the RECALBOX RGB JAMMA SETTINGS menu to reduce latency as much as possible:

REDUCED LATENCY (EXPERIMENTAL)enables numerous options in Retroarch and other emulators to reduce latency (auto frame delay, late polling, etc.).RUN AHEAD (EXPERIMENTAL)pre-calculates frames in advance to save one frame of latency.
Enabled together, and combined with the very low input lag of the Recalbox RGB JAMMA components, these two options drastically reduce latency and get very close to that of the MiSTer or of original games. However, they could have a negative impact on a handful of games, so bear that in mind if certain games slow down.
More info in our complete report on input lag on JAMMA.
¶ NeoGeo layout selection
You can configure the mapping that will be automatically applied when you launch a NeoGeo game.
If you have a 4-button NeoGeo panel, set the number of buttons with the PANEL TYPE option and enjoy the standard NeoGeo mapping:

.png)
For 6-button panels, you can choose between two mappings, set with the NEOGEO/PGM LAYOUT P1 and NEOGEO/PGM LAYOUT P2 options: "line", which uses the in-line mapping of NeoGeo panels, and "square", which uses the mapping of NeoGeo controllers.

.png)
¶ 4 players mode
The 4 players mode is enabled directly from the 4 PLAYERS MODE option of the RECALBOX RGB JAMMA SETTINGS menu.
Players 3 and 4 are mapped to the CPS2 kick harness:
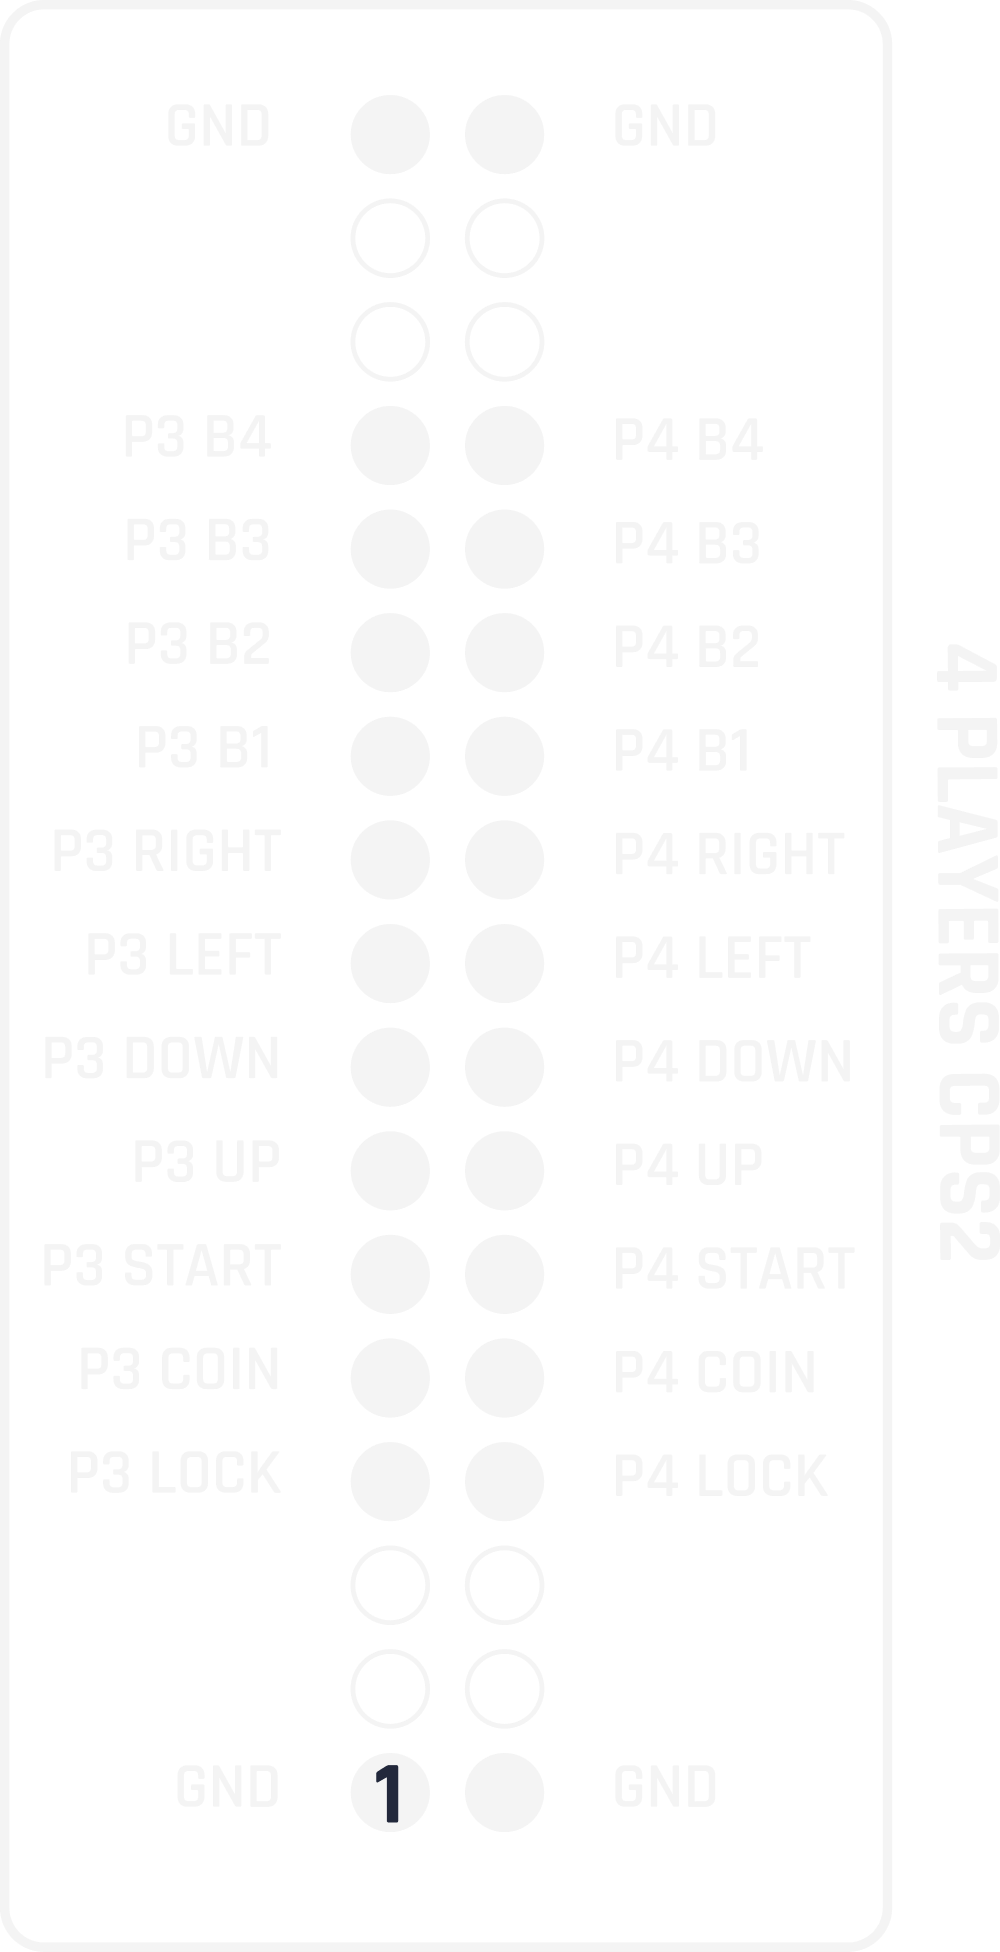
The virtual system containing 3+ player games is automatically enabled when 4 players mode is on.
¶ 5/12 V coin mechanisms
The Recalbox RGB JAMMA is compatible with mechanical or electronic coin mechanisms (+3 V, +5 V, +12 V) on your JAMMA harness. Recalbox automatically detects the logic level of the coin mech (normally open or normally closed) to detect coin insertion.
¶ TEST + SERVICE buttons
The SERVICE and TEST buttons inside the cabinet are supported by the Recalbox RGB JAMMA and have two major uses:
- accessing the service menu of your arcade games (compatible with FinalBurn Neo, MAME, Naomi, Atomiswave), reproducing their original functionality;
- exiting a game with the SERVICE + TEST combination. Handy when you have enabled GameCenter mode but want to change game.
¶ START button patterns
Numerous shortcuts are available with the START button. They can be enabled and disabled from the RECALBOX RGB JAMMA SETTINGS menu:

START+BTN1 = CREDIT: adds a credit with the START + BTN1 shortcut, for every player.START+BTN = HK+BTN: turns START + BTN into HOTKEY + BTN. Useful for opening the Retroarch menus or adjusting the sound.START 3SEC = EXIT: exit games with a long press on START. If disabled, you can still exit games with the TEST + SERVICE combination.START+BTN 5SEC = AUTO FIRE: enables auto fire on a button with START + BTN, and disables it the same way. A reboot resets the turbo modes.START+UP/DOWN = VOLUME: adjusts the sound volume.
Showing or hiding the clones of an arcade game is done with
HOTKEY+LEFT/RIGHT: the shortcut is always active and has no dedicated option.
¶ Shortcuts
.png)
¶ AUDIO
¶ Sound control with the joystick
Use the START + UP and DOWN shortcut on the joystick to raise or lower the sound (START+UP/DOWN = VOLUME option).
¶ Outputs
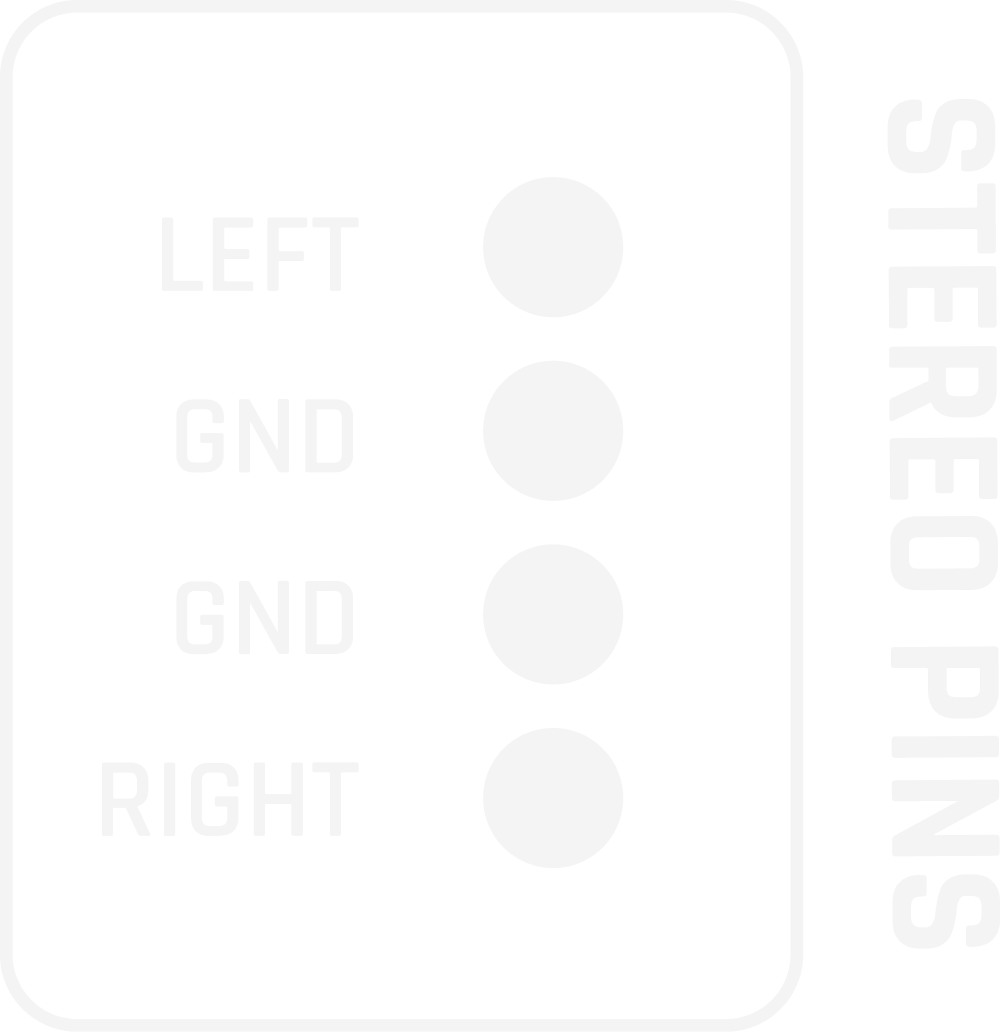
- The jack socket outputs unamplified stereo sound, for use with an external amp.
- The MONO amp outputs sound to the JAMMA audio pins. It can be disabled with the
SOUNDoption. - The 4-pin audio socket also outputs an unamplified stereo signal.
¶ Mono amp boost
The mono amp sound can be adjusted in several ways:
- from the rotary knob on the Recalbox RGB JAMMA;
- from the interface (START + UP/DOWN);
- by increasing the amp gain with the
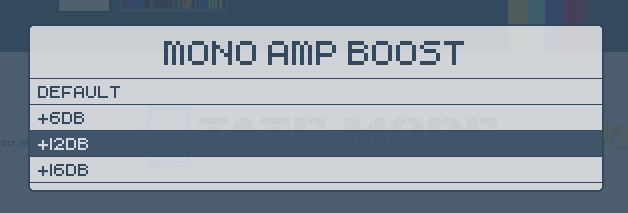
MONO AMP BOOSToption in the menu. Increase the gain step by step to avoid unpleasant surprises
¶ SYSTEM
¶ Automatic systems by publisher
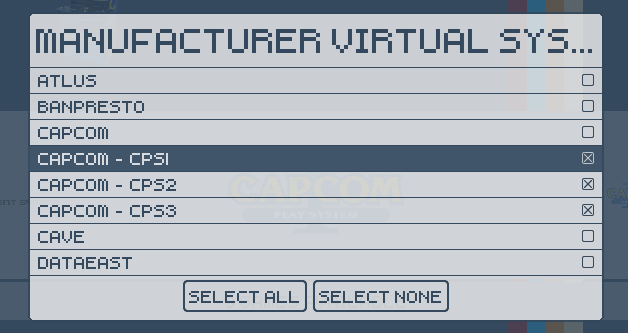
When you add a complete FinalBurn Neo or MAME set, Recalbox can automatically display systems matching each publisher. These systems are automatically enabled by Recalbox for the Recalbox RGB JAMMA.
To enable or disable them, go to the SYSTEM-LISTS & GAMELISTS SETTINGS menu, under the ARCADE SYSTEMS and ARCADE GAMES headers.
¶ Auto boot on game
To boot straight into a game when you power up your cabinet, enable ALLOW BOOT ON GAME in the ADVANCED SETTINGS → BOOT SETTINGS menu.
Then navigate to the game you want to launch automatically, press START and select BOOT ON THIS GAME.
On every startup, the game will be launched automatically. Hold START to exit it and return to the menu.

¶ GameCenter mode
GameCenter mode lets you run the cabinet like in an arcade: a single game is launched, credits have to be added with the coin mech, no shortcut is available, and the game can only be exited with the SERVICE + TEST combination (two buttons inside the cabinet, only reachable by opening the hatch with the cabinet keys).
Add auto boot on game to that, and your cabinet behaves 100% like an original one.
To enable GameCenter mode, simply disable the START button patterns in the RECALBOX RGB JAMMA SETTINGS menu:

¶ Kiosk mode
Kiosk mode lets you enjoy the Recalbox game selection while removing the ability to reach the frontend menus or the game menus. It also disables adding and removing favourites.
To enable it, edit the recalbox.conf file and replace the line:
emulationstation.menu=default
with:
emulationstation.menu=none
You will then need to edit this file again and set the value back to default to restore all Recalbox features.
¶ System updates
Recalbox system updates are frequent, and we're proud of it. Bugs are fixed as fast as possible, and you get the latest features quickly.
Recalbox will automatically offer the update if your system is connected to the internet, over cable or Wi-Fi.
¶ USB hard disk
We recommend using an SD card to store the system and the games on the Recalbox RGB JAMMA.
If you decide to use an external USB hard disk, you will need to enable a Raspberry Pi firmware option in the recalbox-user-config.txt file, located on the RECALBOX partition when you plug the SD card into your PC.
Open the RECALBOX/recalbox-user-config.txt file with a text editor and add the following line at the end:
usb_max_current_enable=1
¶ TIPS
¶ Astro City grey power supplies
Sega Astro City 400-5198-01Y grey power supplies (and only this model) cause problems on systems that don't draw enough current on the 5 V rail at startup.
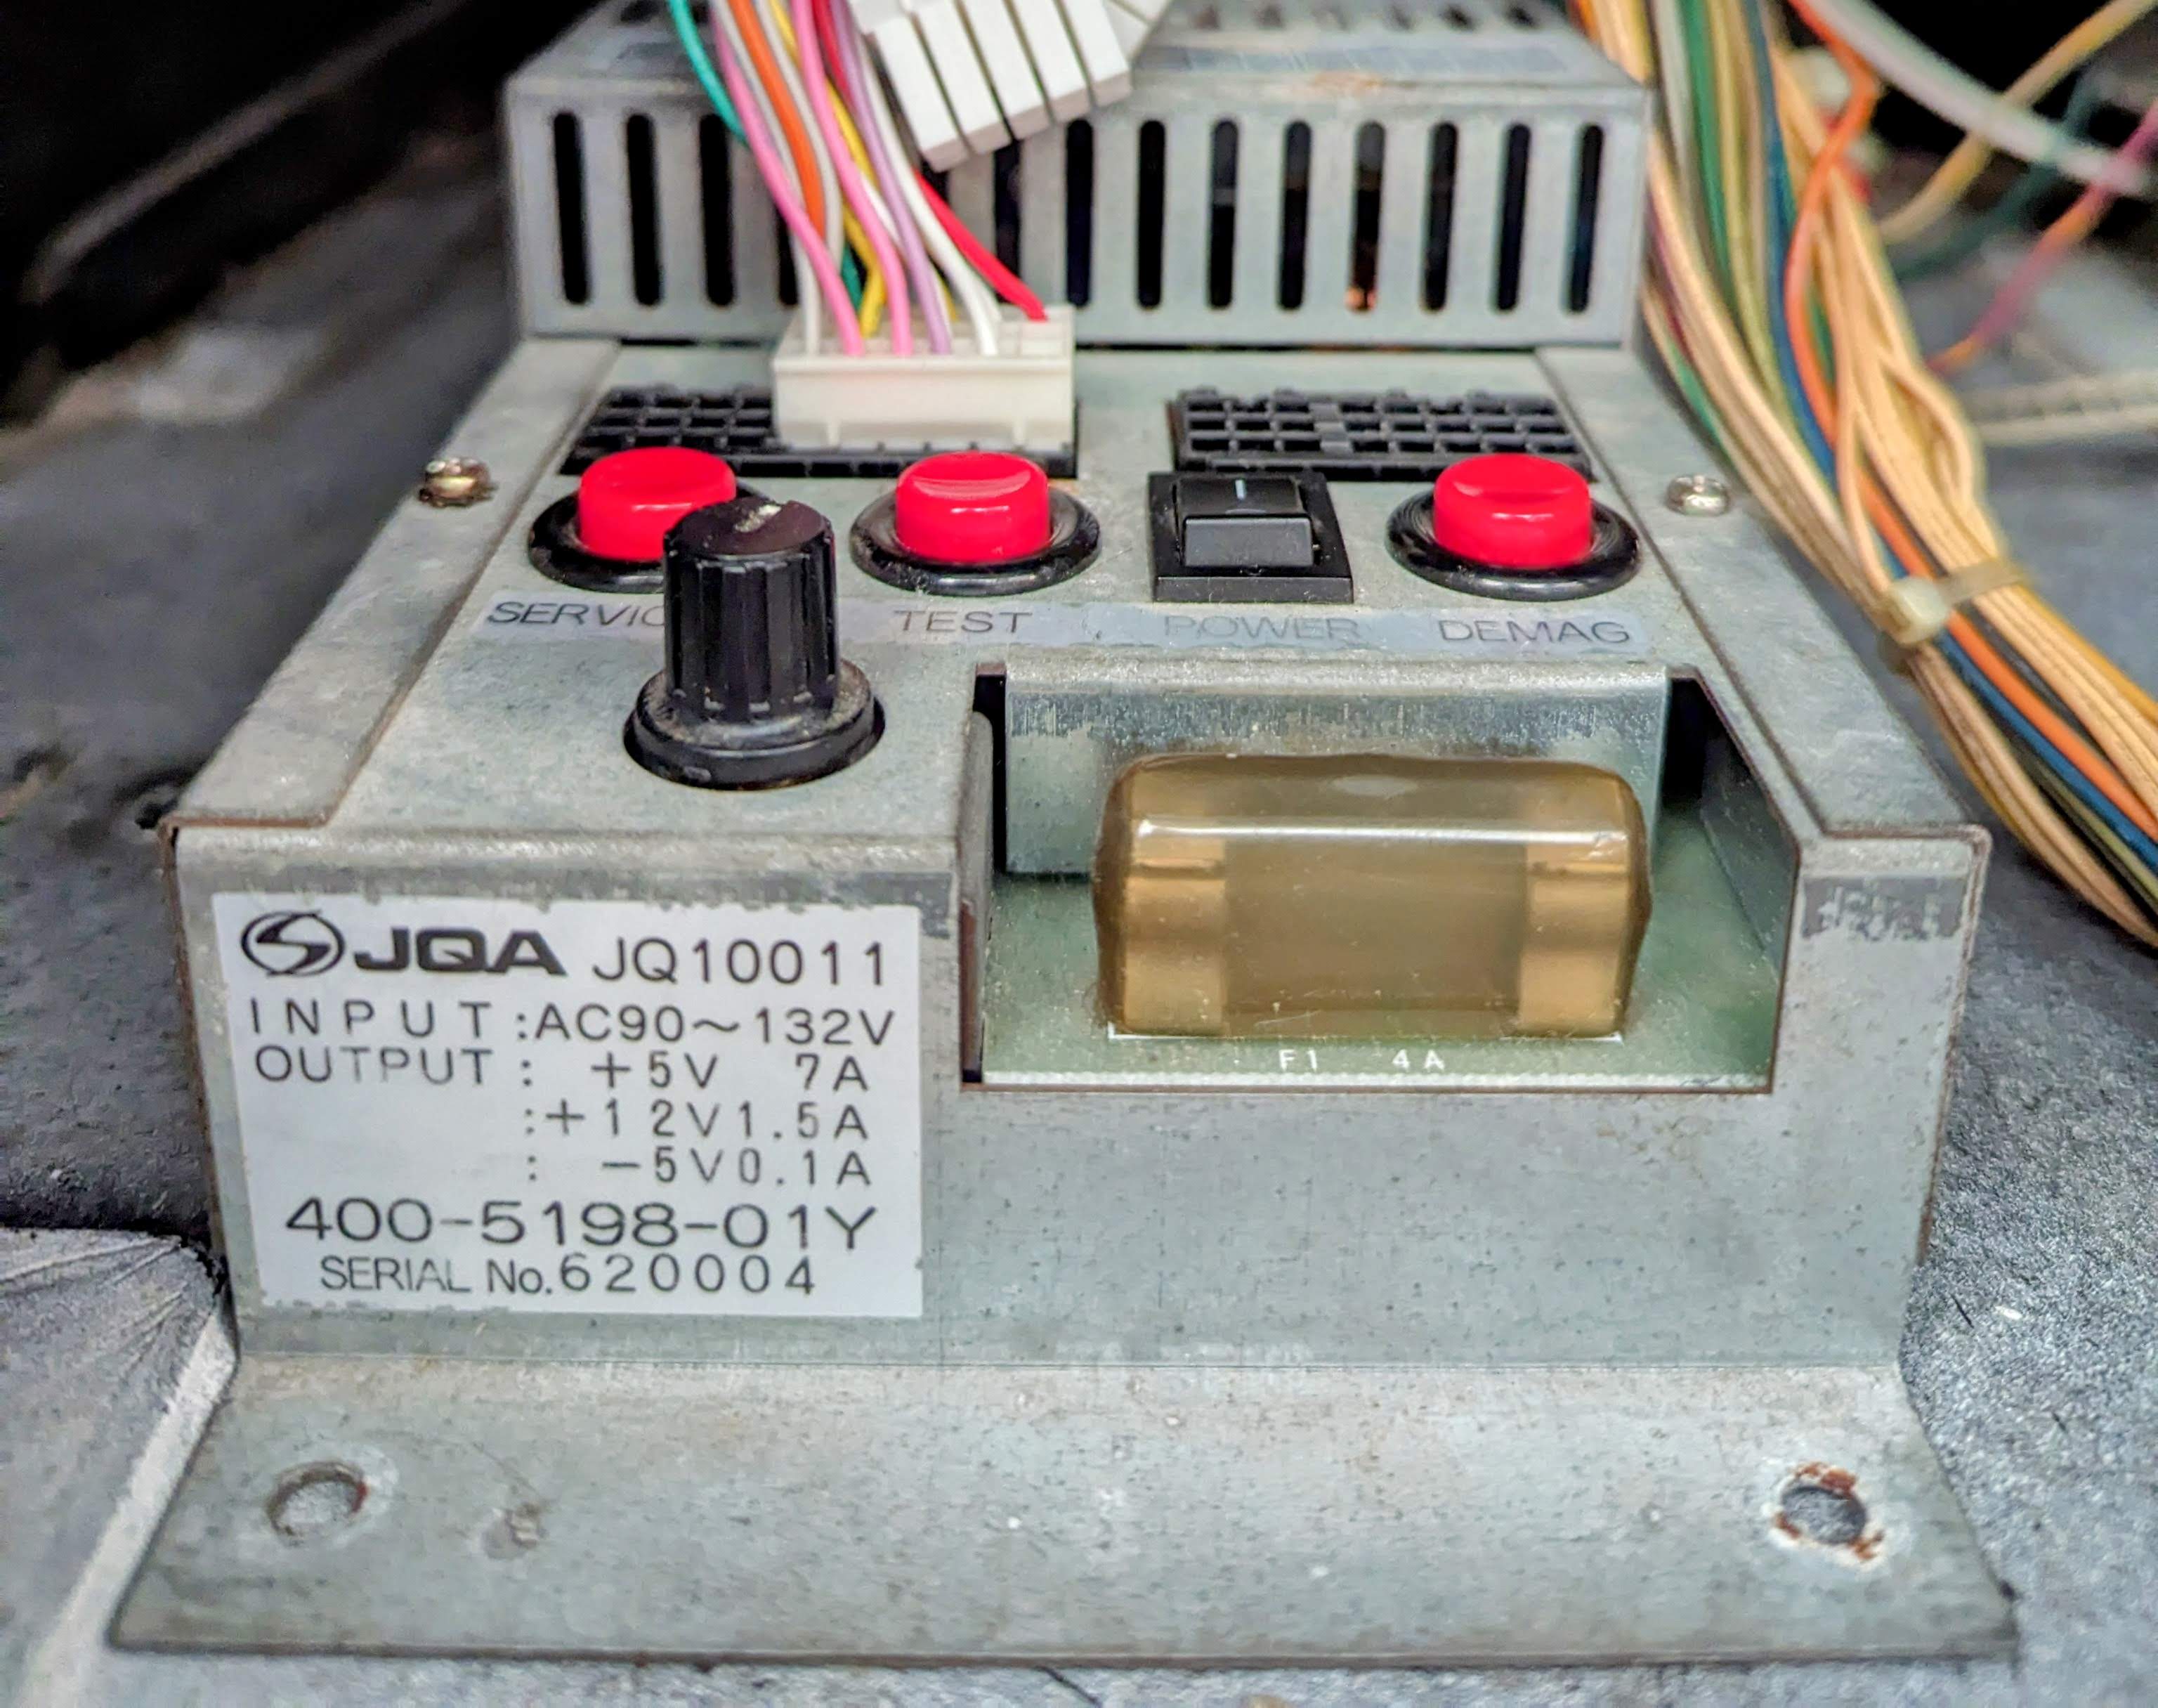
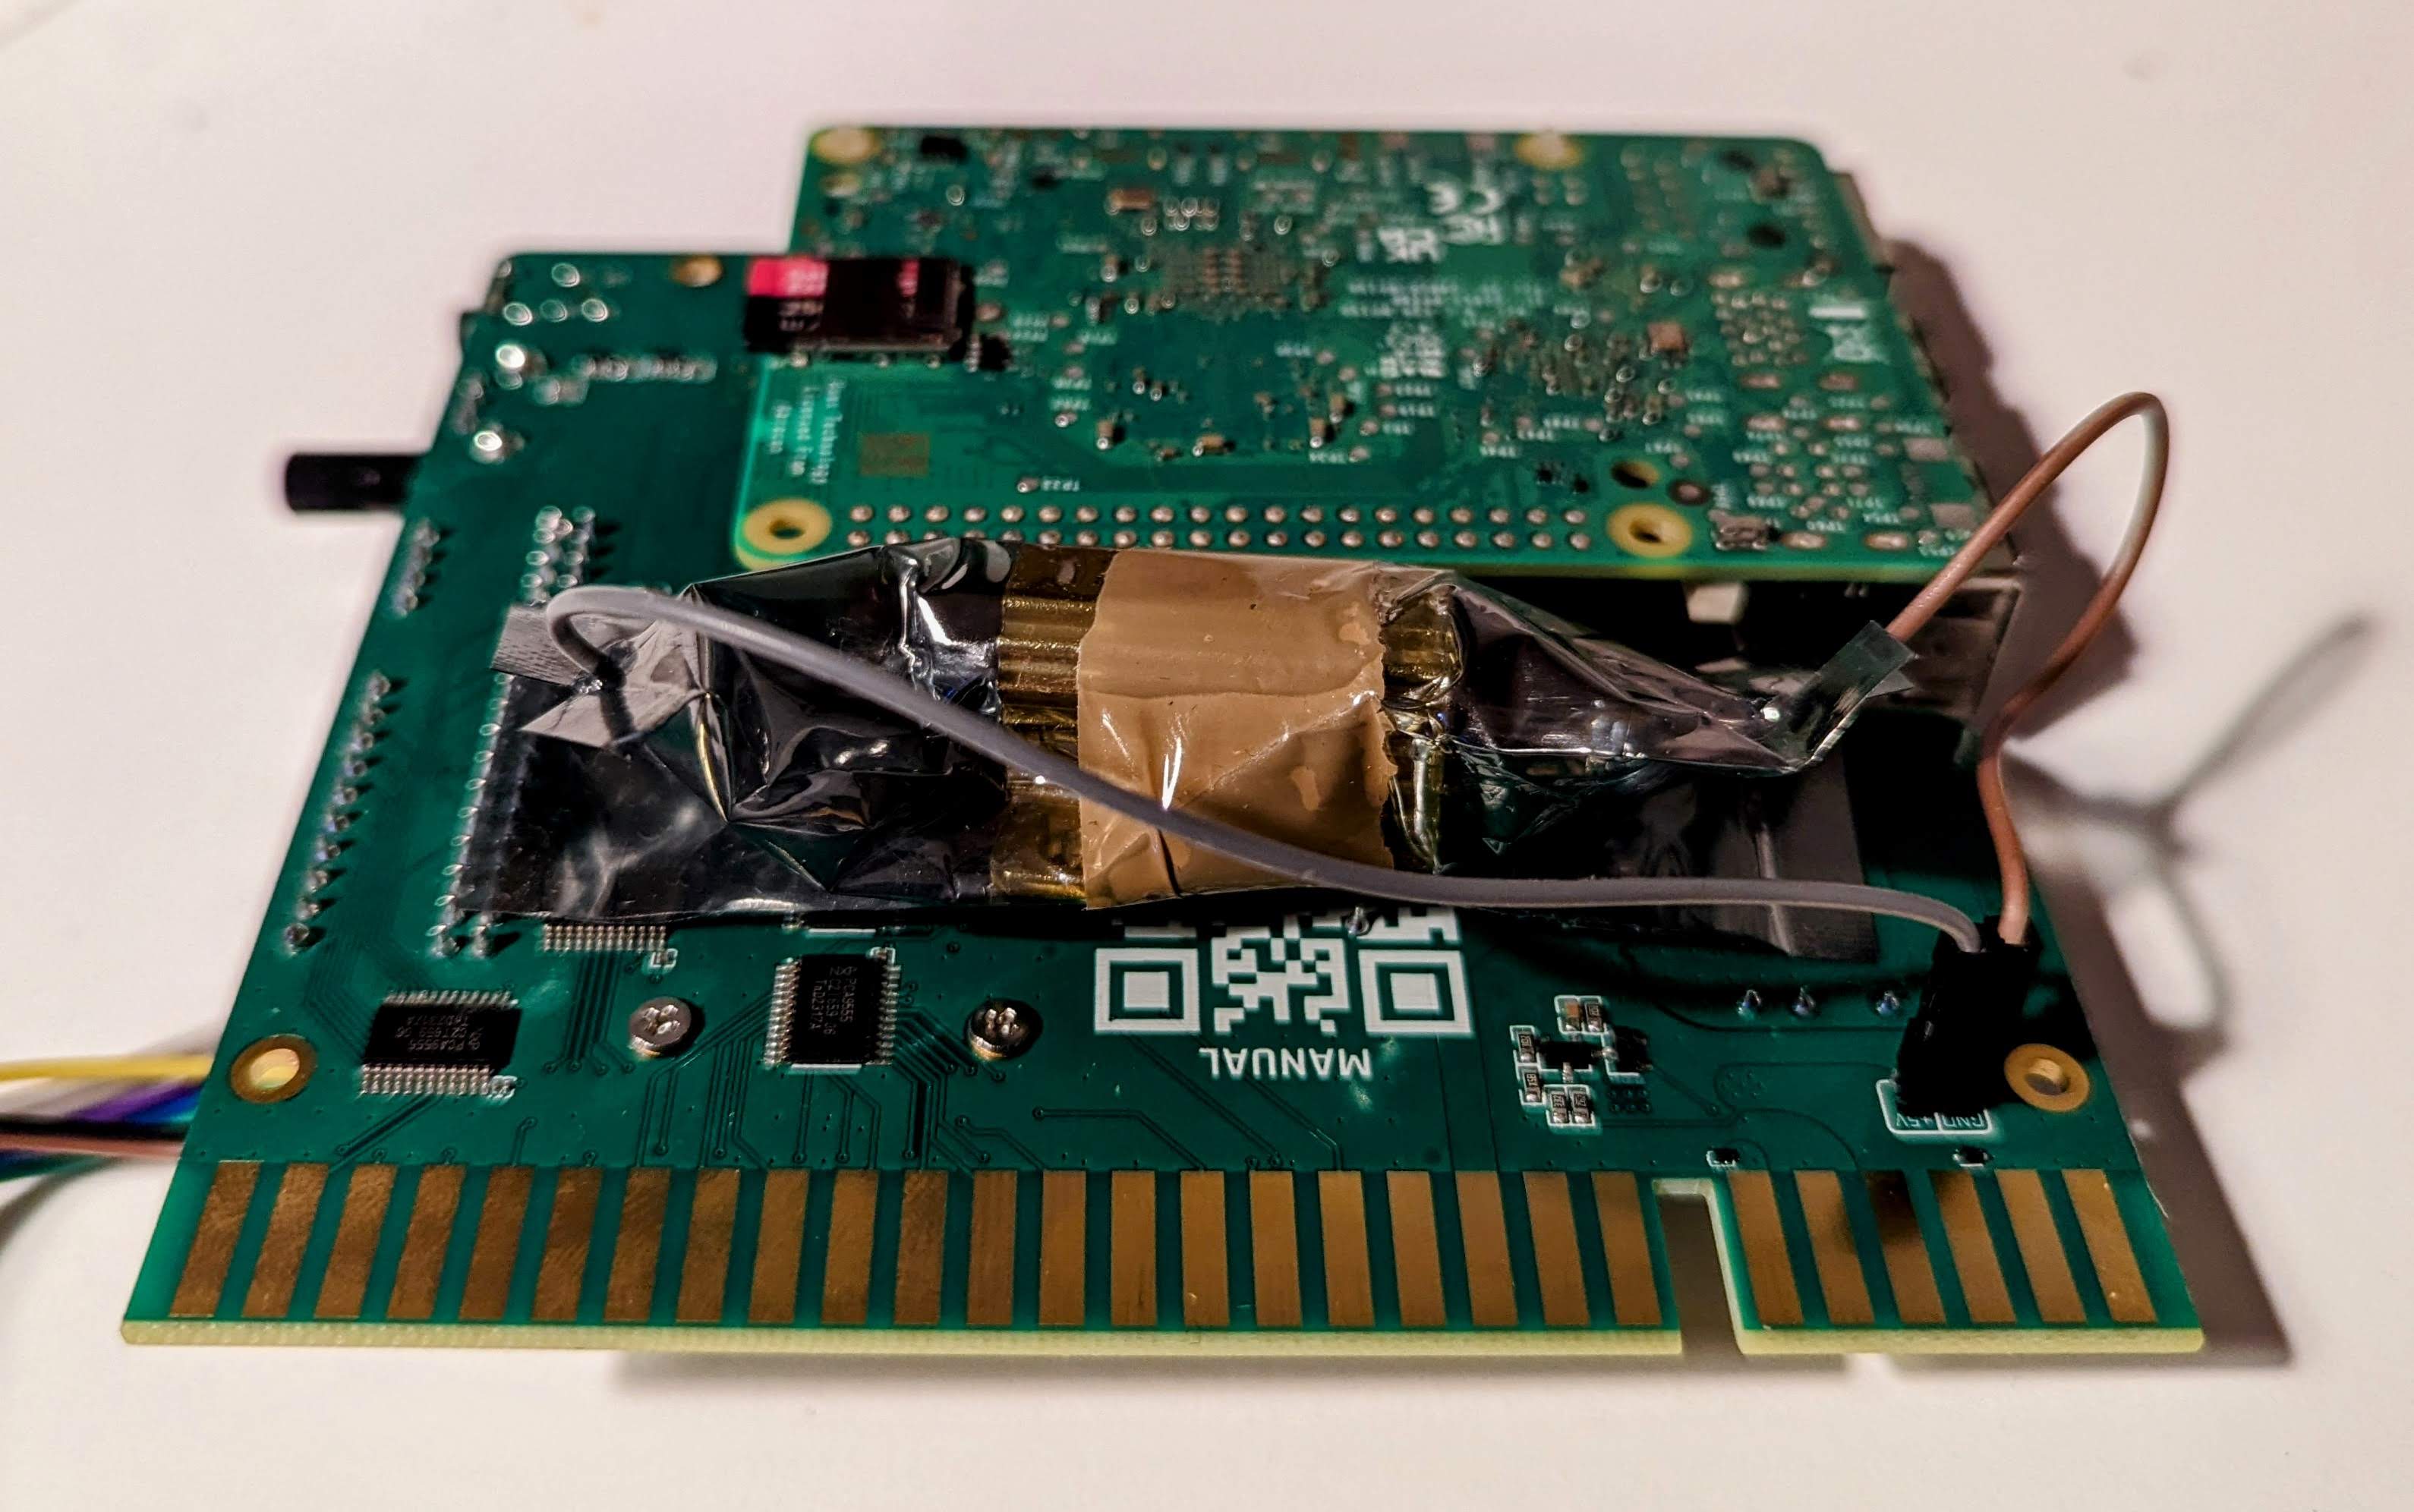
If this is the case, you can connect an 8 Ω resistor (minimum 25 W, 50 W recommended) to the two +5V and GND pads located near the power input on the Recalbox RGB JAMMA. This draws the current needed to keep the power supply from tripping at startup.
Prefer Dupont pins and cables rather than soldering wires directly onto the board. Be sure to insulate your resistor to prevent short circuits (its copper body is conductive).
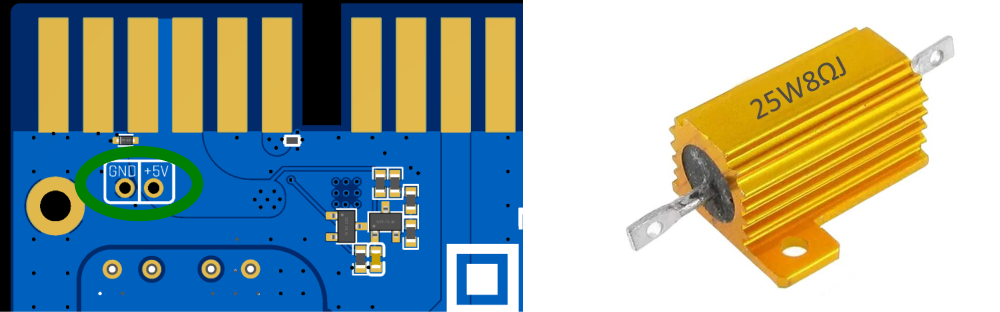
Here the resistor has been insulated with anti-static plastic:
¶ Troubleshooting
My Raspberry Pi won't boot, and only the top-right LED is lit on the Recalbox RGB JAMMA.
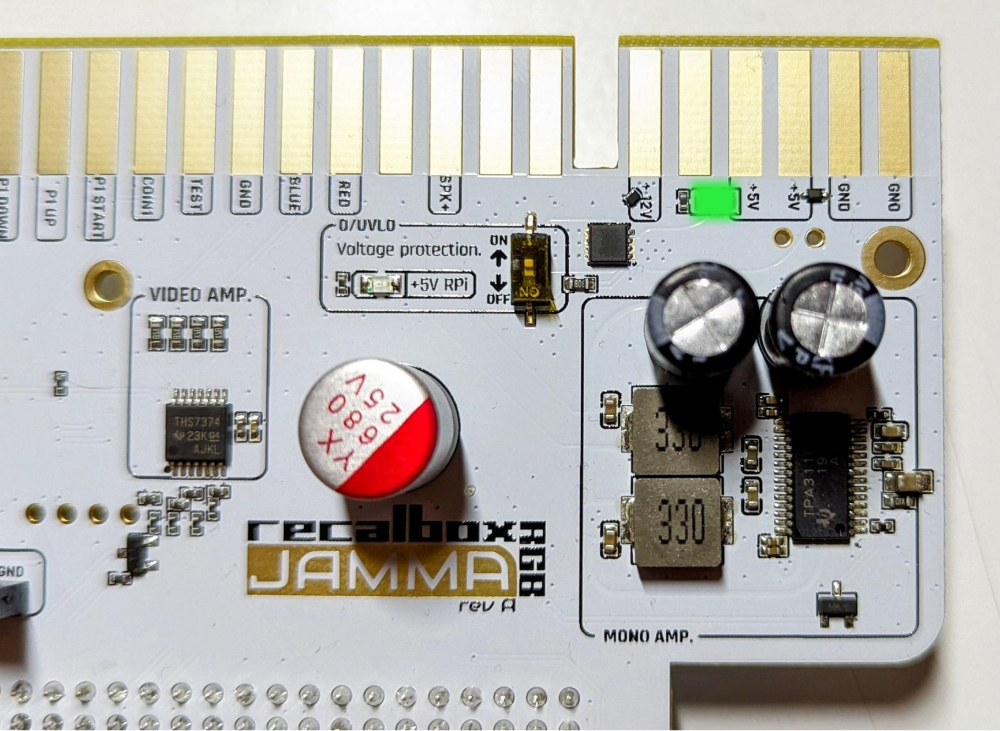
If the power LED lights up but the +5V RPi LED of the OUVLO system stays off, the protection system is preventing current from reaching the Raspberry Pi. Your cabinet's power supply is either too high (above 5.25 V) or too low.
You will need to adjust it with a suitable screwdriver, to reach between 5.1 V and 5.2 V off-load.
¶ FAQ
- Do I need to add a fan or a thermal pad to the Raspberry Pi?
No, the fan on the Recalbox RGB JAMMA is sufficient for cooling. - Do I need to add a USB power supply?
No. - Is it compatible with JVS cabinets?
Not directly. You will need a PCB to adapt JAMMA to your cabinet's JVS. Once adapted, the Recalbox RGB JAMMA is fully compatible with JVS cabinet controls and screens (31 kHz or multisync). For a natively JVS cabinet, the dedicated solution is Recalbox JVS. - Where can I buy a Recalbox RGB JAMMA?
From the official store: Recalbox RGB JAMMA 2 complete kit (subject to availability and release date), and the Recalbox RGB JAMMA category for accessories. - How do I scrape my games?
You can scrape your games to retrieve information, images and videos directly from Recalbox'sSCRAPERmenu. Bear it in mind if you are a patron:- patron level 1: auto-scraping retrieves game information automatically as you browse your lists;
- patron level 2: on top of auto-scraping, you can use Recalbox's servers to scrape all your games in record time.
- Can I run games in 480i?
Only 480i-compatible games can run in 480i. It is not possible to force a 480i mode for a game with a native 240p resolution. On Raspberry Pi 4/400 and 3, 480i is automatic on compatible games (Dreamcast, Atomiswave, etc.). On Raspberry Pi 5, 480i mode is not supported, and your games will launch either in 240p on a 15 kHz screen, or in 480p on a 31 kHz or multisync screen. - Can I overclock my Raspberry Pi?
You can overclock any Raspberry Pi from theADVANCED SETTINGS→OVERCLOCKmenu. We strongly advise cooling the Raspberry Pi if you overclock. Bear in mind that overclocking means higher power consumption, and therefore a bigger voltage drop: disable it if undervoltage alerts appear. - What happens if I turn the voltage up too high?
The Raspberry Pi and the Recalbox RGB JAMMA work up to 5.25 V. Above that, the OUVLO system of the Recalbox RGB JAMMA cuts the power to protect the circuits. - How do I make my own 4-player cables?
You can order the parts (connectors, etc.) from an arcade parts reseller and follow the pinout given above on this page. - Which arcade games and sets do you recommend?
The arcade romsets compatible with the emulator versions Recalbox ships are detailed on the Arcade page. We recommend starting with a FinalBurn Neo fullset, which contains most of the 2D games you are looking for, then picking the games you want from the MAME set. - Can I connect additional controllers / joysticks?
Yes. We recommend playing with USB controllers, but Bluetooth is also compatible and easily enabled from the controller options. Remember to reconfigure the buttons the first time you connect a controller. - Can I run 240p (15 kHz) games on a 31 kHz-only screen?
240p, 224p and similar resolutions are run in a 31 kHz mode on your display, which doesn't support 15 kHz modes. However, the240P GRIDoption of the Recalbox RGB JAMMA gets you as close as possible to the rendering of a 15 kHz screen. - Are light guns supported?
The Namco GunCon 2 works with the Recalbox RGB JAMMA, on a cathode-ray screen only (15 kHz and, since 10.1, 31 kHz). Sinden, AimTrak and Gun4IR guns are not supported. See the Lightguns on Recalbox page. - Is it risky to change frequency in multisync?
No, as long as your monitor chassis doesn't change modes dozens of times a minute. That said, some people agree that the relay making that clicking noise when the resolution switches is the weak point of automatic multi-frequency chassis. It's up to each of us to use it or not; the Recalbox RGB JAMMA cannot be held responsible if your chassis fails. - Can I remove the intro videos?
Yes, from theADVANCED SETTINGS→BOOT SETTINGSmenu. - Can I add my own intro video?
Yes, as explained on the Boot videos page. - How do I update?
Simply connect your Recalbox to the internet, with an Ethernet cable or over Wi-Fi. The system will offer to update when you start your cabinet and a new version is available. - What microSD size do you recommend?
For a 100% arcade experience, 128 GB is enough (games and scraping included). For arcade plus 8/16/32-bit consoles without CD games, prefer 256 GB. - How do I use a Recalbox RGB JAMMA in a Naomi cabinet?
To plug a Recalbox RGB JAMMA into a Naomi NUC, you'll need a JAMMA to JVS adapter. Several are available online. Recalbox JVS is the dedicated solution for these cabinets. - Can I damage my Recalbox RGB JAMMA by plugging it into the JAMMA harness the wrong way round?
We have put safeguards in place to prevent damage to the Recalbox RGB JAMMA or the Raspberry Pi when it is plugged in upside down. Still, be careful when plugging it in to avoid any risk to your installation. - Should I increase my power supply voltage if I get an undervoltage message?
By their very nature, the length of the JAMMA harness cables means a significant voltage drop in your installation. It is therefore normal to raise your voltage, off-load, to between 5.05 V and 5.2 V depending on the PCBs you install in the cabinet. - Are the tokens compatible with coin mechanisms?
The tokens are very close in size to 100 yen coins and are compatible with many mechanical and electronic coin mechs. They remain collector goodies though, and compatibility with your coin mech is not guaranteed. - Can I switch off my cabinet without using the Recalbox menu?
Yes. Still, remember to use the shutdown menu when you change settings or add/remove favourites. - Is the Recalbox RGB JAMMA compatible with my 1, 2, 3, 4, 5 or 6-button panel?
Yes, see the controls section above for the compatible wirings. - Is the Recalbox RGB JAMMA compatible with a cabinet with an HDMI screen?
No. - Can I customise my button layout?
You can choose different layout options for the NeoGeo, for example. However, you cannot reconfigure the buttons for the different systems and games. There is a reason for this: we want to offer you a plug-and-play experience. As the button layout on panels is standard, the mapping configuration already adapts to every game and every system. - Does the Recalbox RGB JAMMA fit into a Vewlix/Chewlix cabinet?
No, not if the display requires an HDMI video input. For these cabinets, have a look at Recalbox JVS. - Is the Recalbox RGB JAMMA compatible with emulation systems other than Recalbox?
No. - Which Raspberry Pi is the Recalbox RGB JAMMA compatible with?
The Raspberry Pi 3, 4, 400 and 5. - Is it compatible with Raspberry Pi clones (Orange Pi, etc.)?
No. - Can I keep the Raspberry Pi 5 fan?
No, the Recalbox RGB JAMMA fan is more than enough to cool the Raspberry Pi. - Can I adjust the image geometry from the Recalbox RGB JAMMA?
You can set the image position for each display mode in the calibration screen of theRECALBOX RGB JAMMA SETTINGSmenu. However, the vertical and horizontal image size must be set directly on your screen. - Is it compatible with all JAMMA cabinets?
If your cabinet is fitted with a JAMMA harness, the Recalbox RGB JAMMA is compatible! - Can I turn the sound up from the Recalbox RGB JAMMA?
You have many ways of adjusting the sound:- from your cabinet's amp;
- from the pot on the Recalbox RGB JAMMA;
- from the sound options menu;
- from the START + UP/DOWN shortcut, if it is enabled in the options.
- The sound is saturating.
- Set the sound to 90% maximum in the sound options.
- Turn the mono sound pot on the Recalbox RGB JAMMA to maximum.
- Adjust your cabinet's amp accordingly.
- Can I connect my Recalbox RGB JAMMA to a supergun?
Yes. - My favourites are not saved.
To save your favourites (after adding or removing a favourite game), shut down from the menu (START→QUIT→SHUTDOWN). - I get video noise.
- The RGB levels of the Recalbox RGB JAMMA are close to those of original PCBs, often higher than some Raspberry Pi-based multi solutions. Remember to set your levels on your chassis pots.
- Remember also to check the grounding of your cabinet.
For any other question, join the Recalbox Discord server.