The Recalbox RGB DUAL 2 is the official Recalbox hat for the Raspberry Pi 5: it connects your Pi to a CRT screen in native RGB (SCART, 15/31 kHz VGA or composite), with sound, and with zero configuration.
¶ Preparation
¶ Installation
The Recalbox RGB DUAL 2 requires Recalbox 10 or newer, on a Raspberry Pi 5.
Download the Recalbox image for the Raspberry Pi 5 from the official download page, then follow the installation guide.
¶ Assembly in the RecalTower
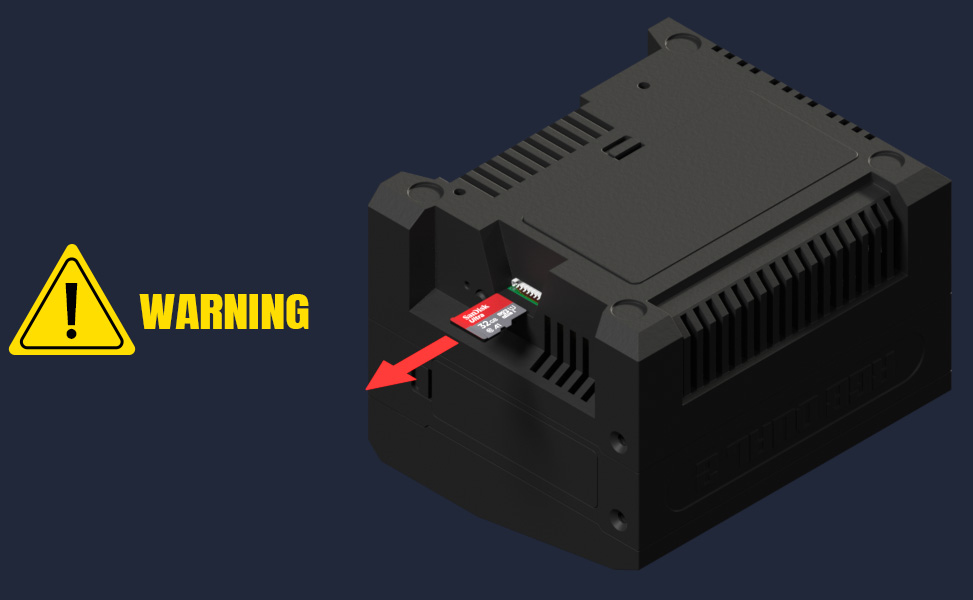
WARNING! ALWAYS REMOVE THE SD CARD BEFORE REMOVING OR INSERTING THE PI 5 INTO THE CASE.
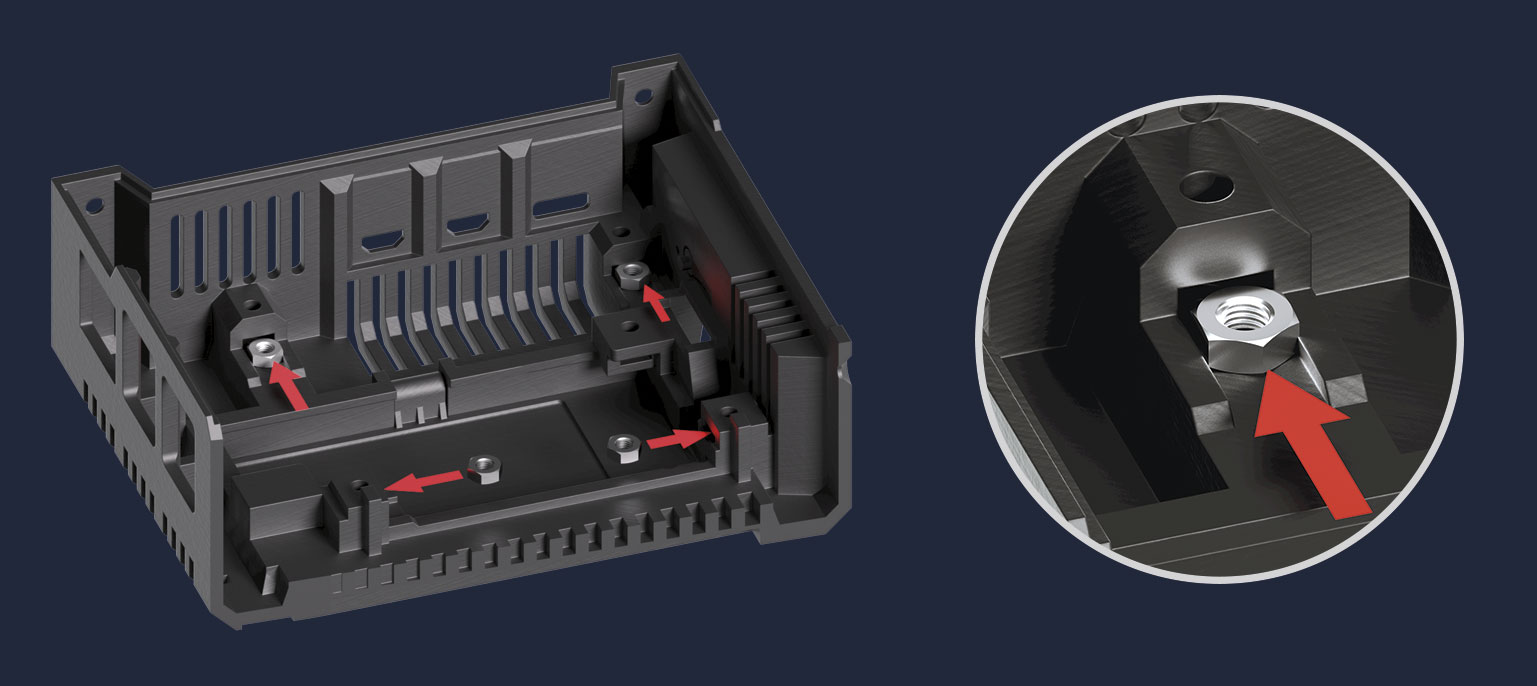
- Place the 4 nuts in their locations on the Raspberry Pi 5 floor.
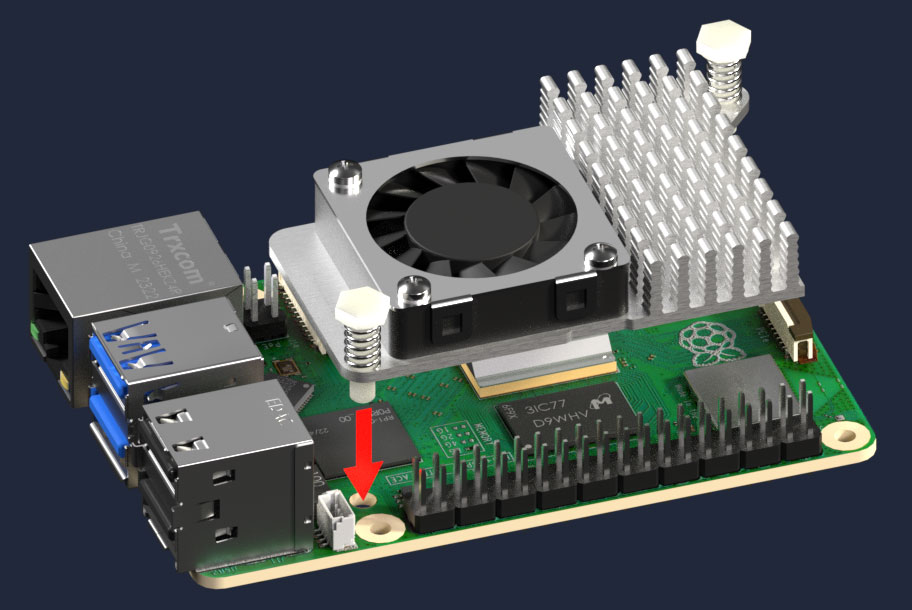
- Add the fan to your Raspberry Pi 5 (not supplied — the official Raspberry Pi 5 Active Cooler works fine).
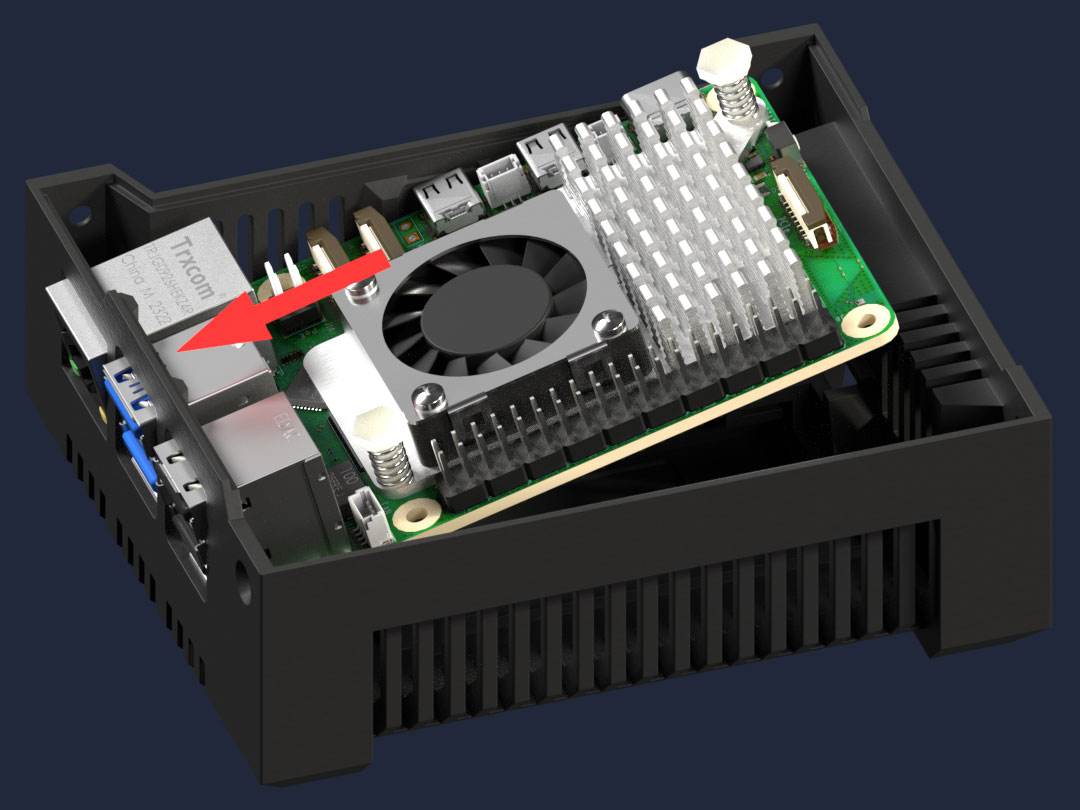
- Position the Raspberry Pi 5 in its floor, sliding the USB ports in first.
- Use the M2.5 flat head screws provided in the kit to secure the 4 screws on the Raspberry Pi 5. This step matters: it prevents damage to your Raspberry Pi 5 if you take the RecalTower apart.
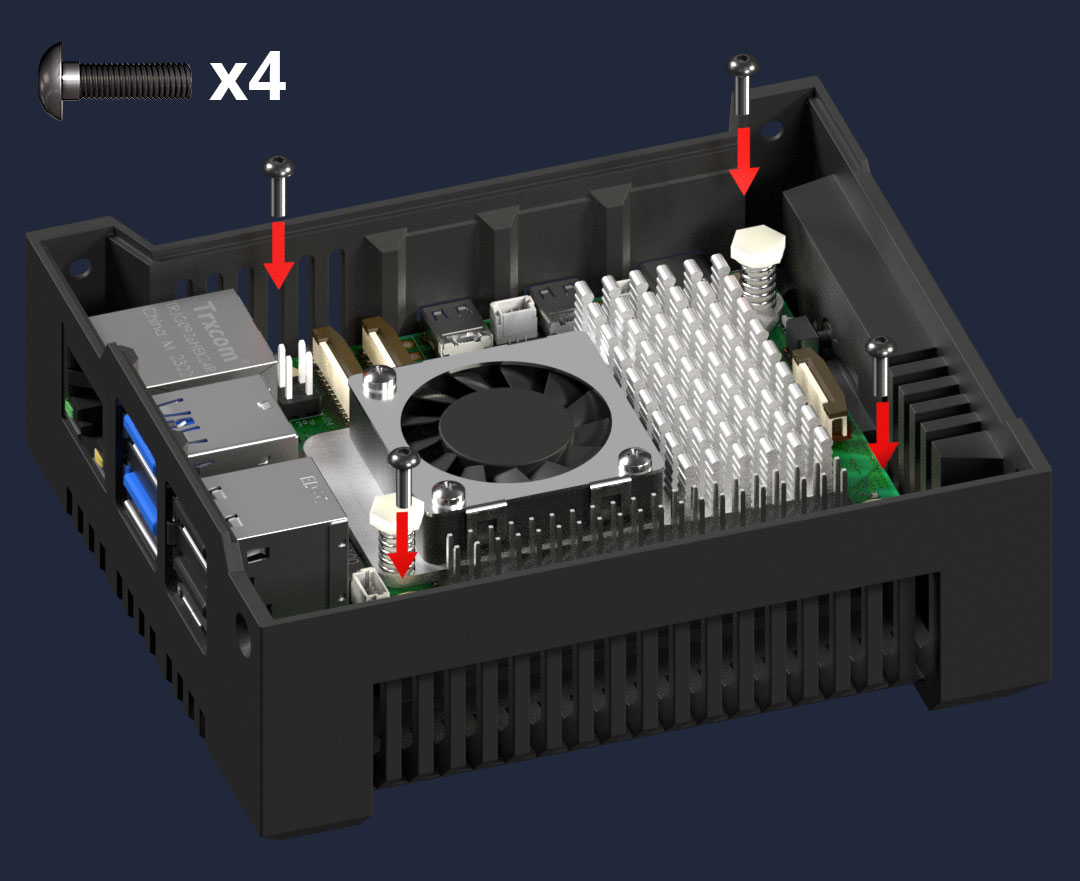
- Place the nuts in the slots on the Recalbox RGB DUAL 2 floor.
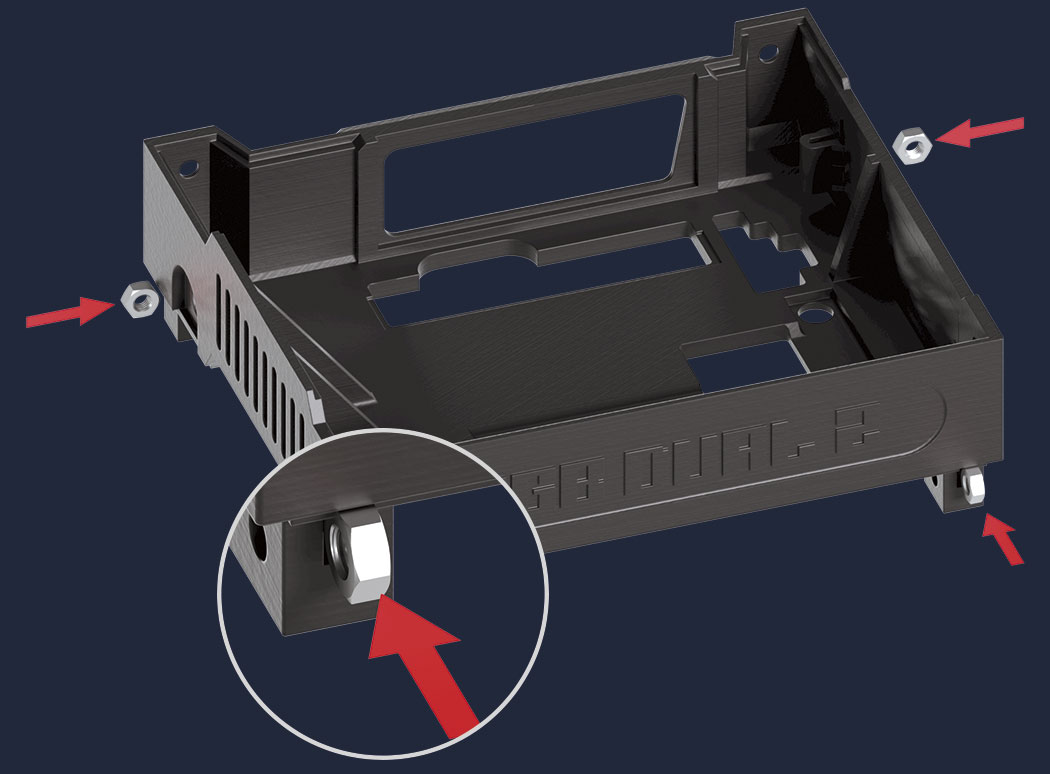
- Position the RGB DUAL 2 floor on top of the Pi 5 floor.
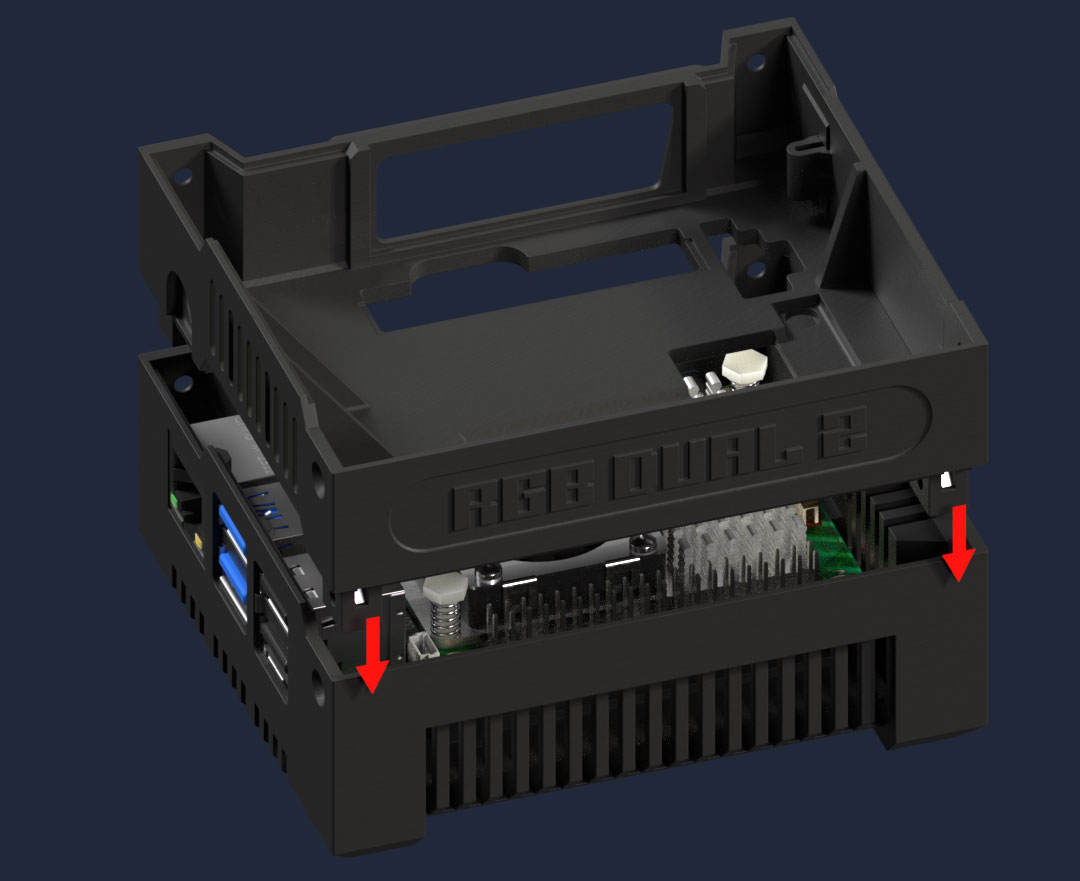
- Position the Recalbox RGB DUAL 2 in its floor.
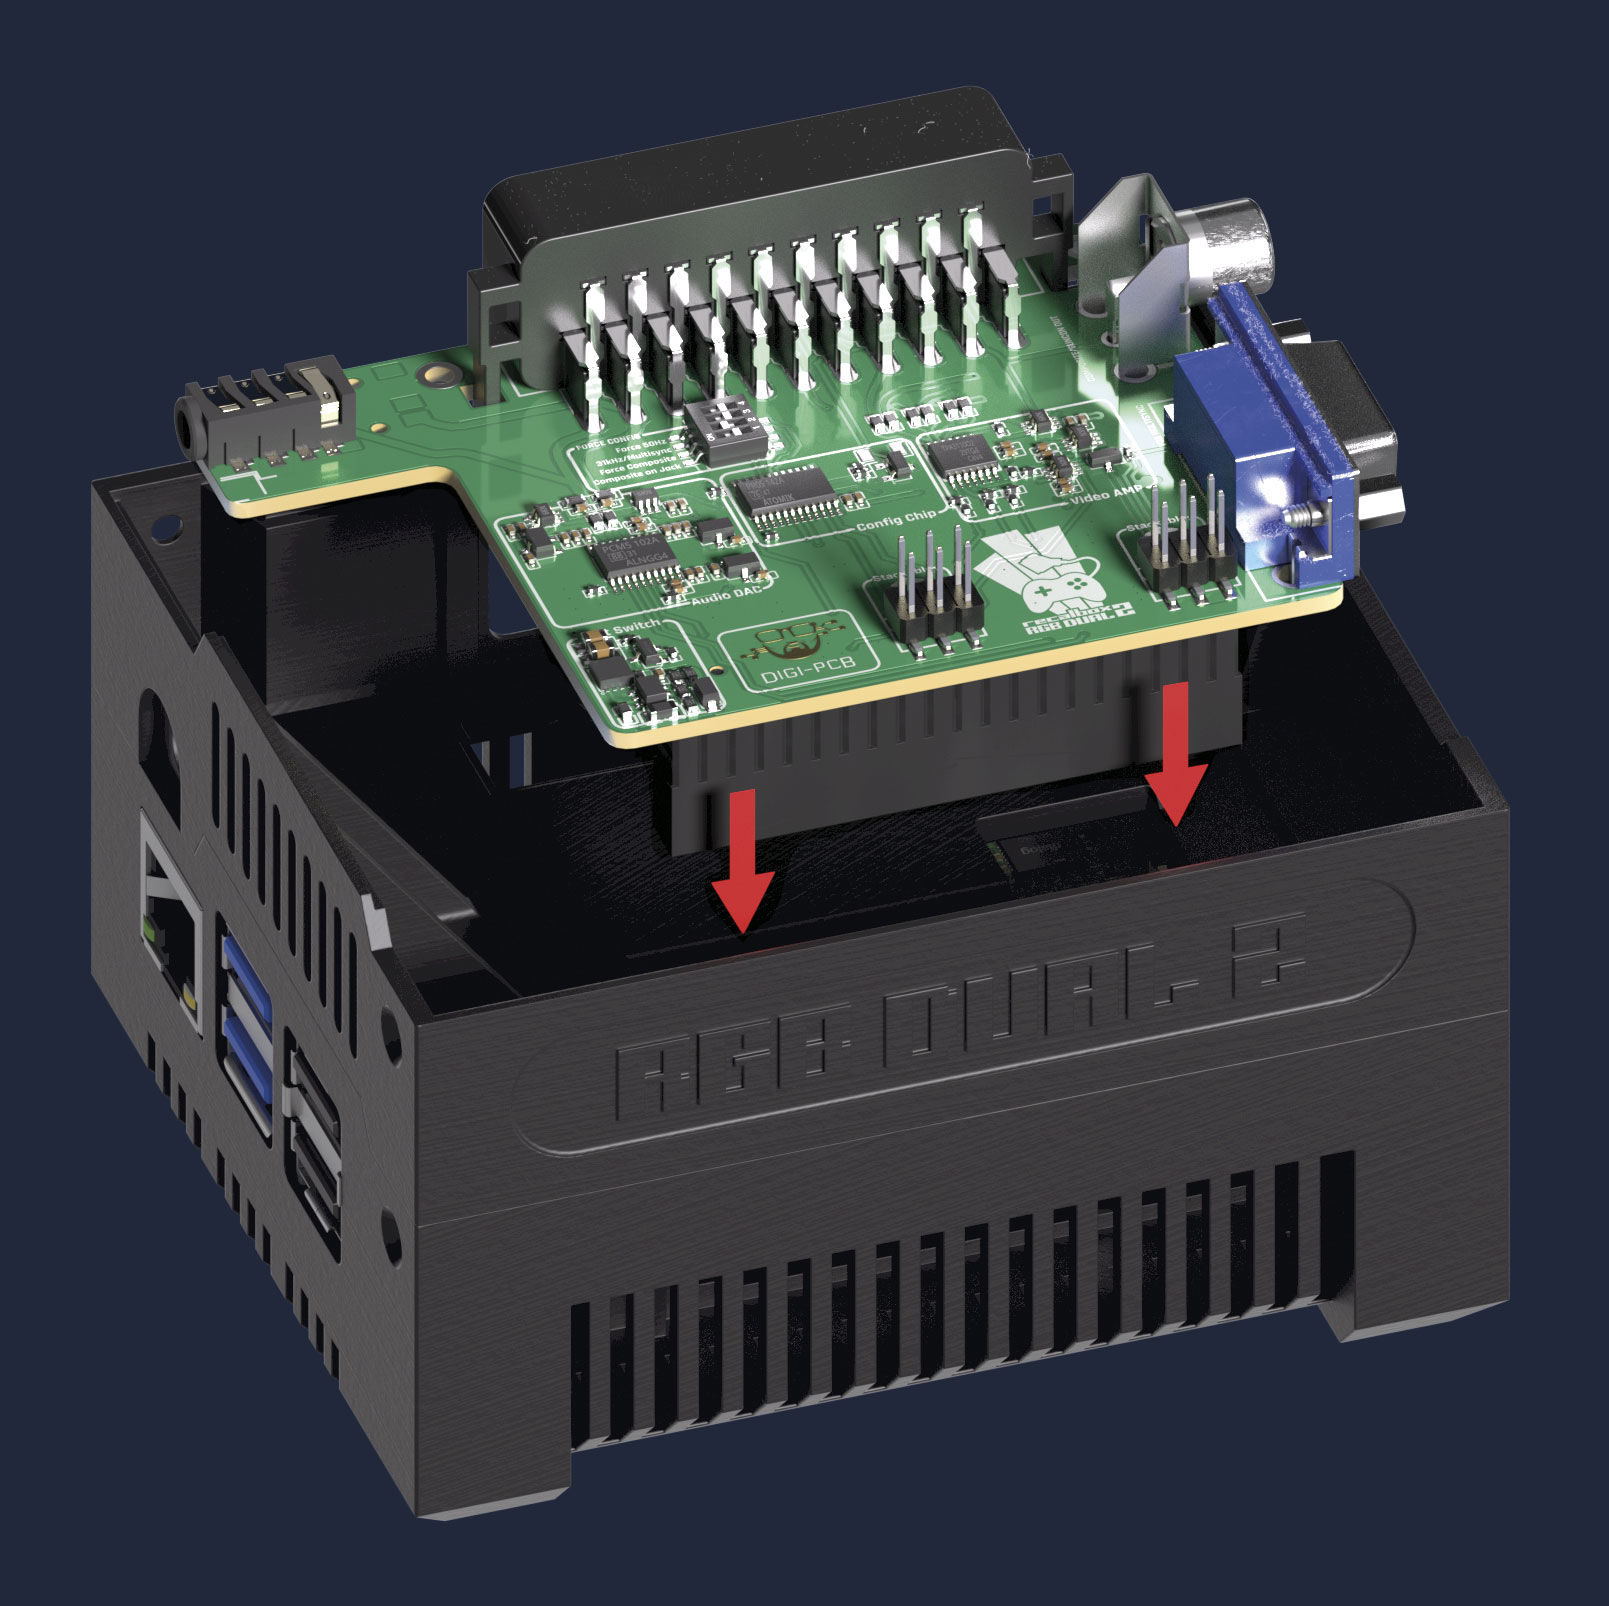
- Screw the floor in place with 4 countersunk screws.
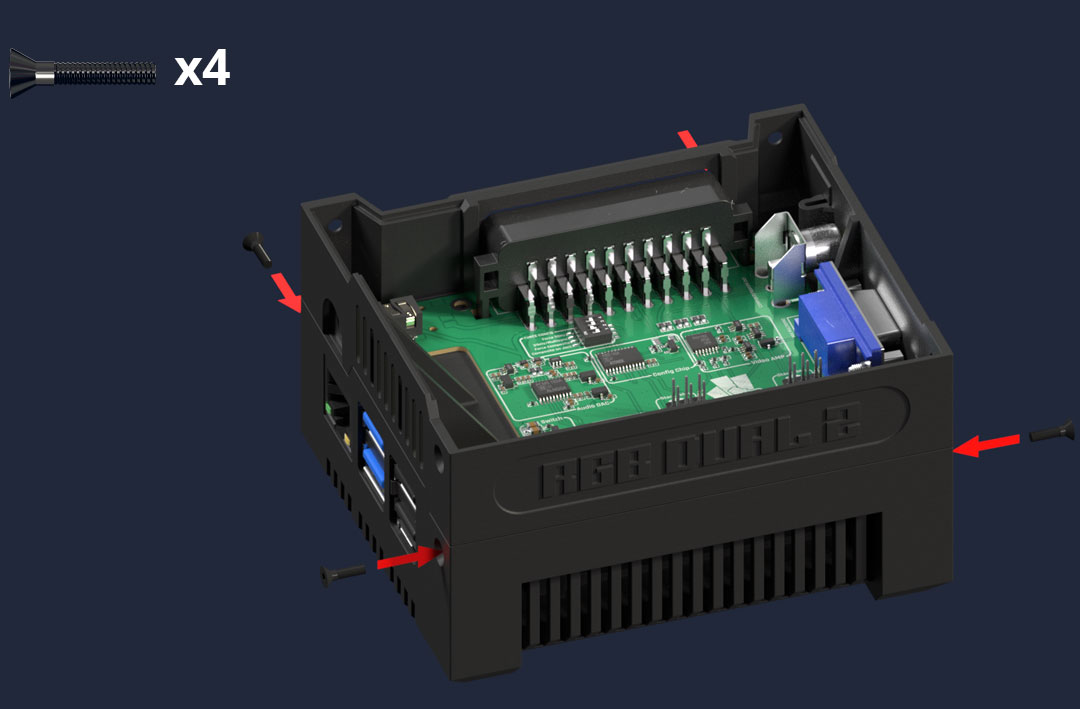
- Use the remaining 4 nuts and 4 countersunk screws to secure the top section of the RecalTower.
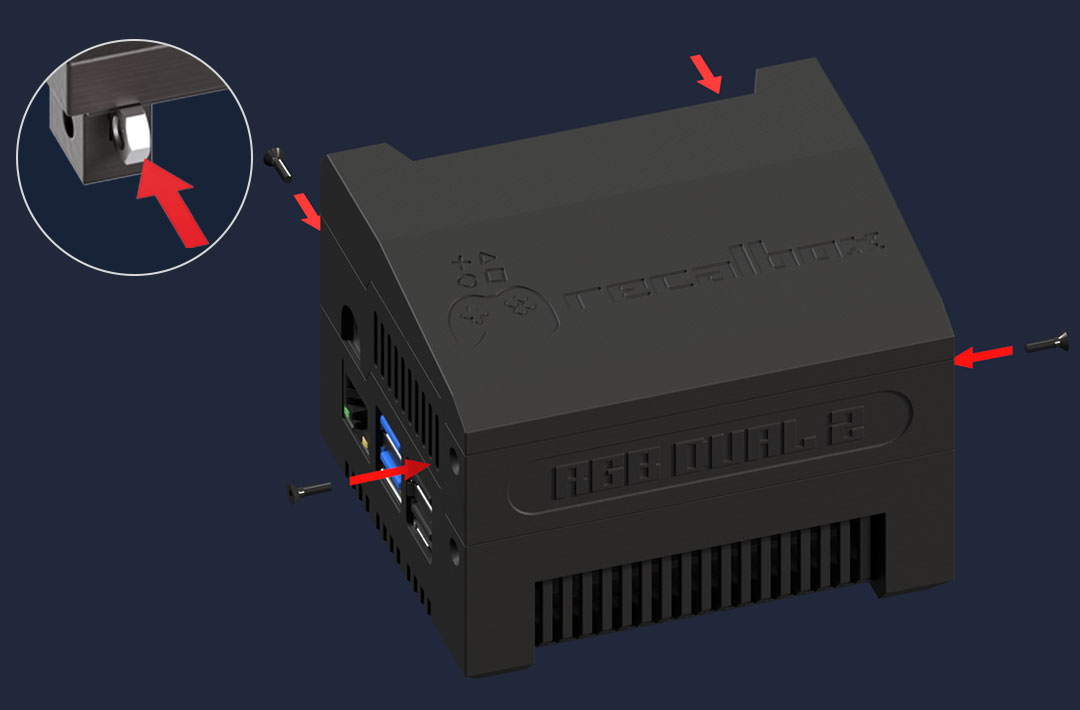
- WARNING! ALWAYS REMOVE THE SD CARD BEFORE REMOVING THE PI 5 FROM THE CASE.
¶ How do I remove the RGB DUAL 2?
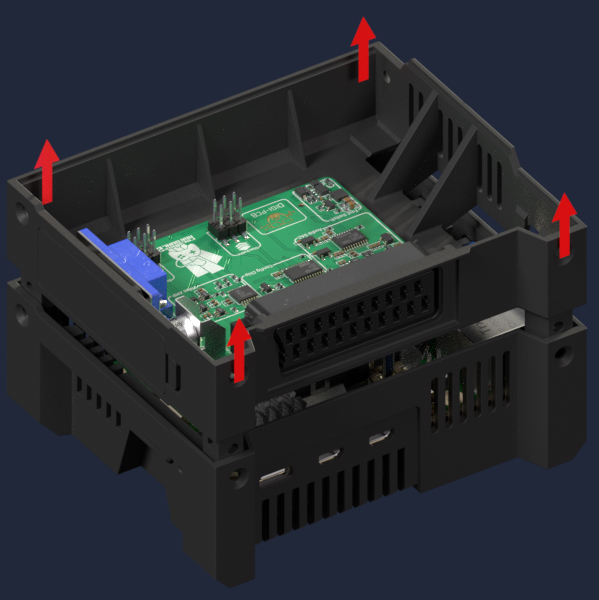
To remove the RGB DUAL 2, simply unscrew its floor and pull it upwards while holding it by the corners. The case is designed to pull the RGB DUAL 2 out with it.
¶ Assembly without a RecalTower
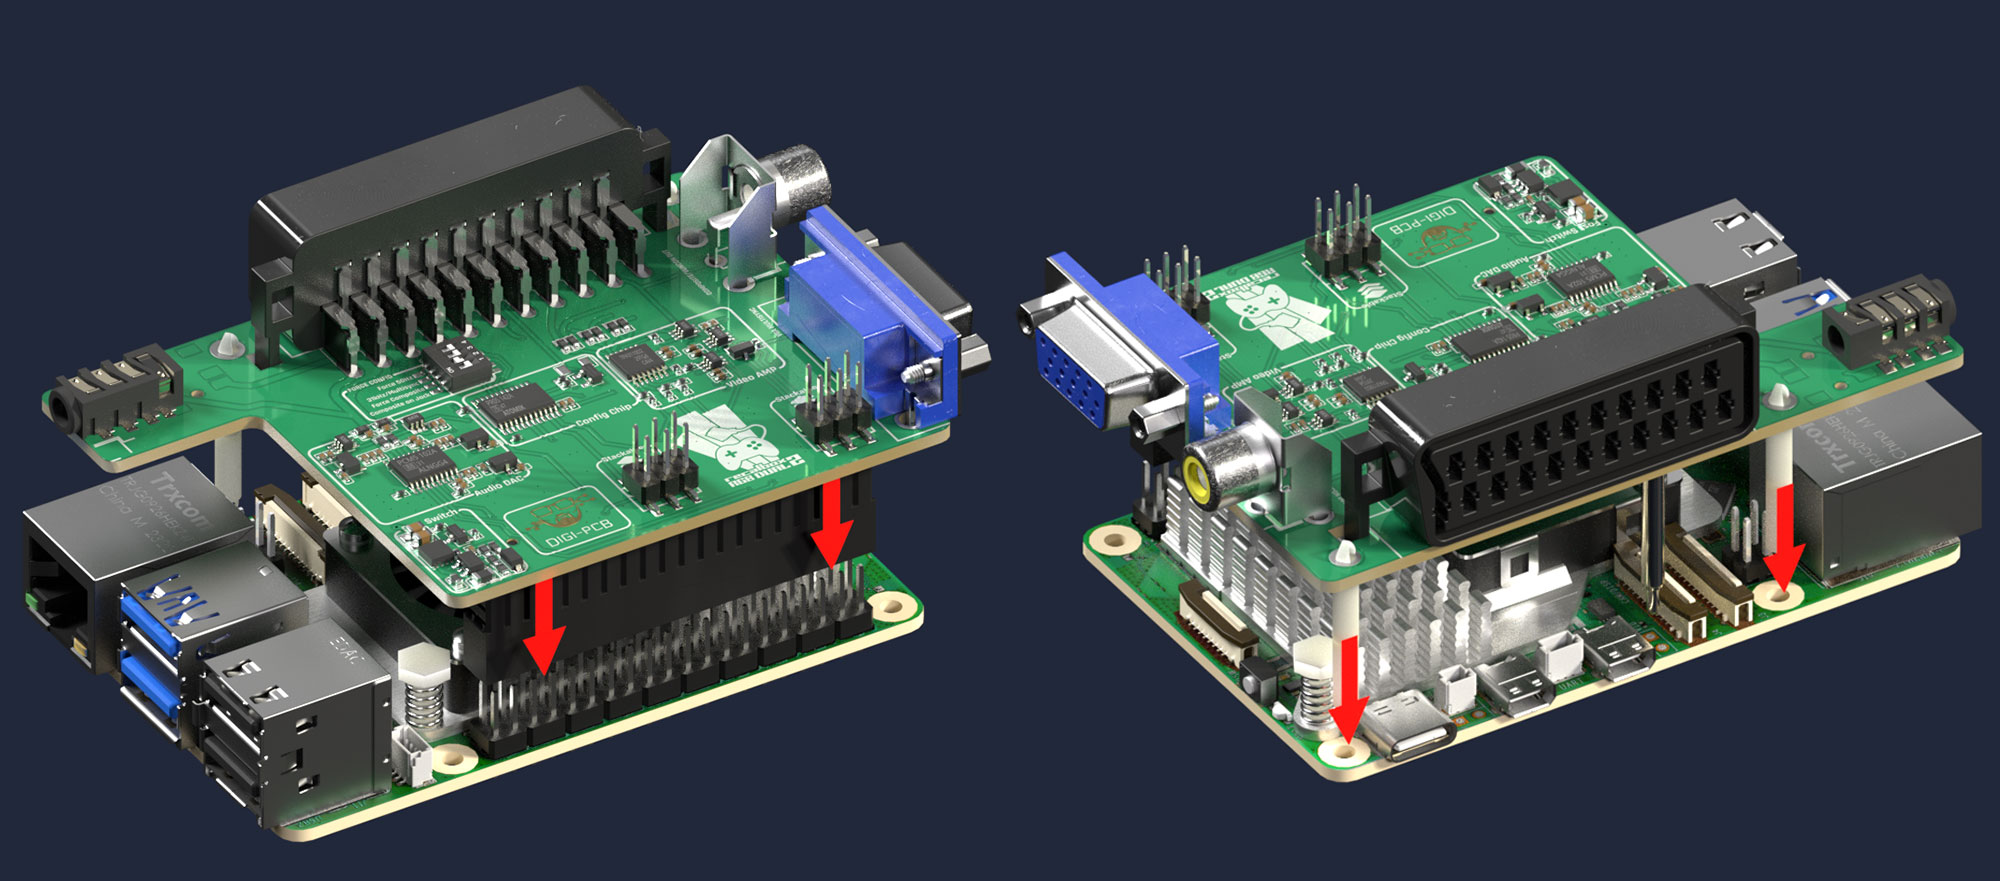
- Check that both spacers are present to secure the Raspberry Pi 5 to the Recalbox RGB DUAL 2.
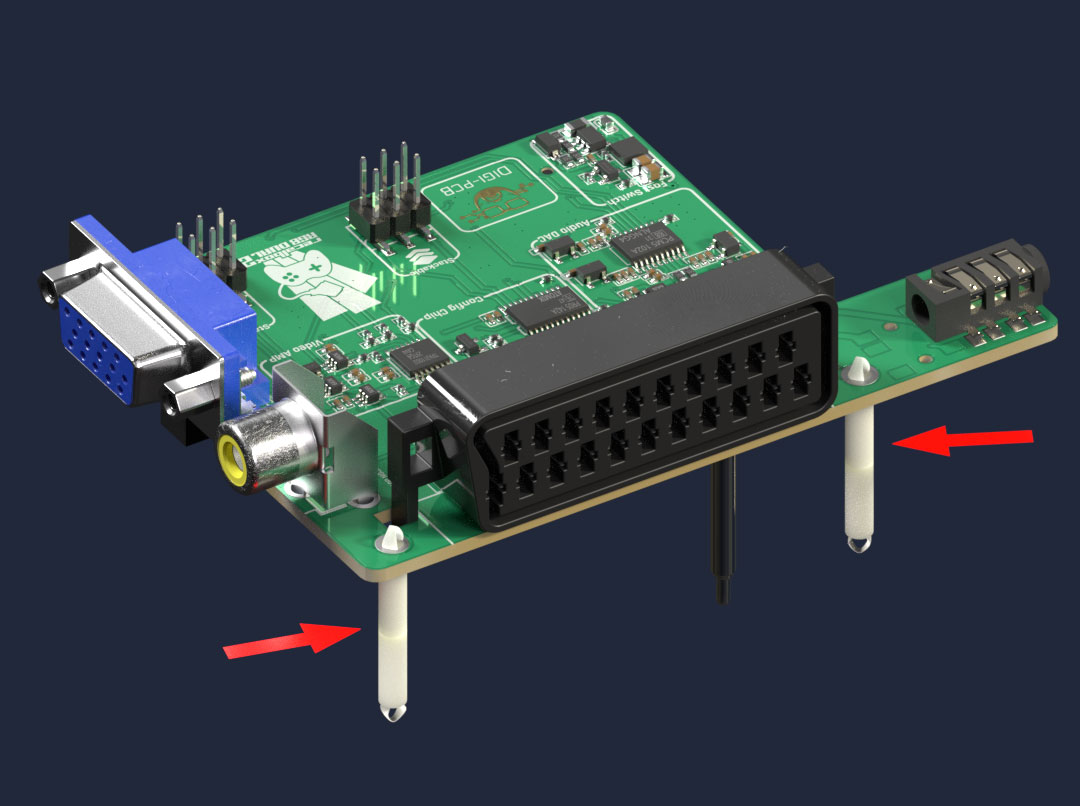
- Clip the Recalbox RGB DUAL 2 onto the Raspberry Pi 5.
¶ Configuring the dipswitches according to your TV
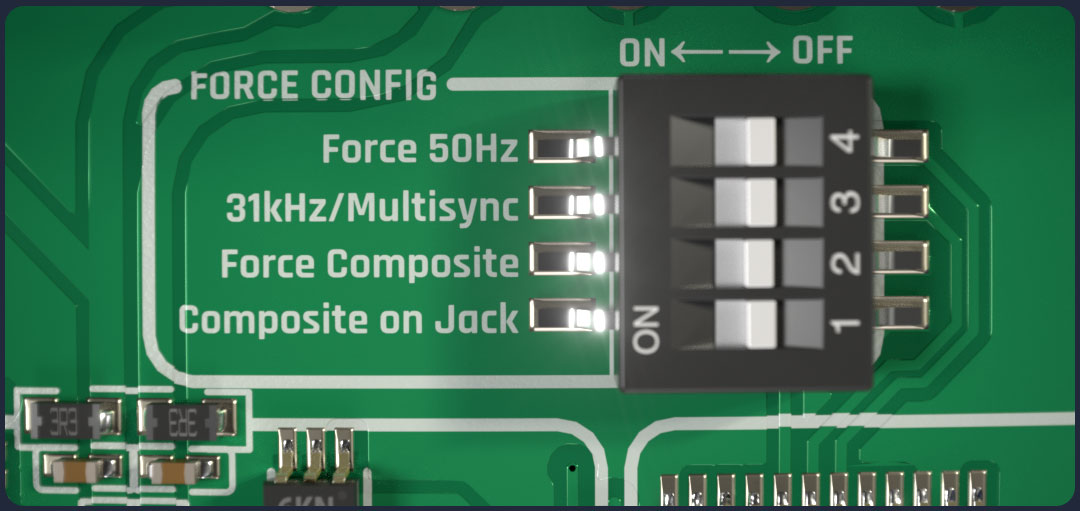
Dipswitches are small switches found on the Recalbox RGB DUAL 2. They configure the options that guarantee compatibility with every screen on first boot, without having to touch a single configuration file.
- CRT TV over SCART supporting 60 Hz: leave all switches in the OFF position.
- CRT TV over SCART supporting 50 Hz only: set the Force 50Hz switch to ON.
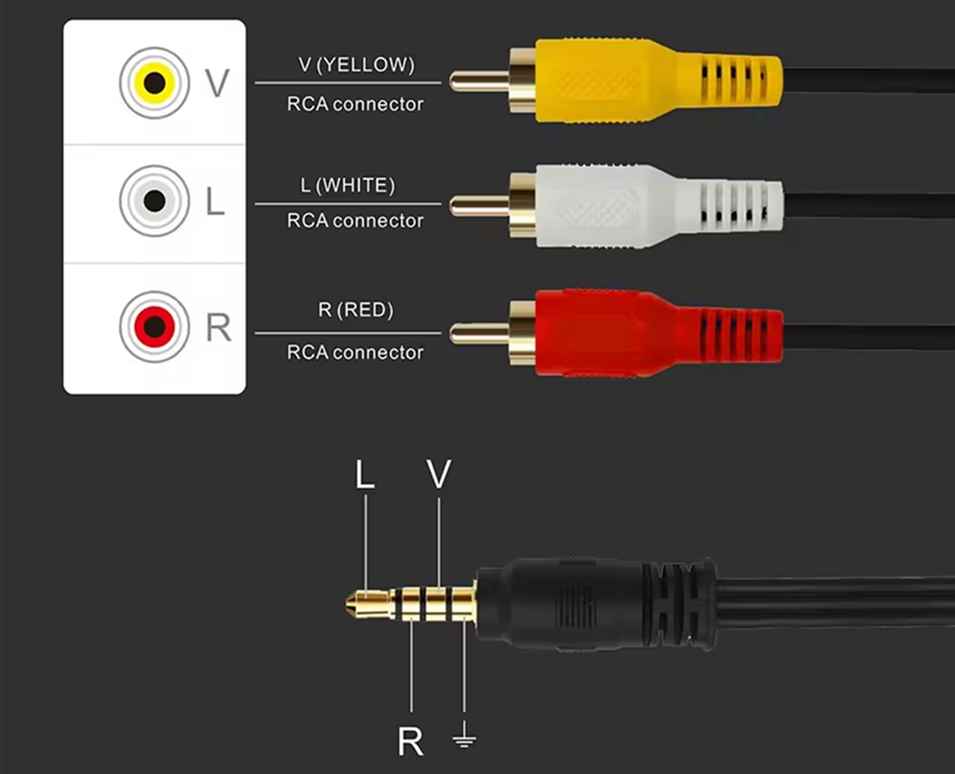
- Composite TV with jack + RCA cable: set the Force Composite switch to ON.
- Composite TV with audio + video jack: set the Force Composite switch to ON and the Composite on Jack switch to ON.
- 31 kHz / multisync monitor: unlock 31 kHz by setting the 31kHz/Multisync switch to ON. The Recalbox RGB DUAL 2 automatically switches to 31 kHz and the screen selection menu is unlocked in the
RECALBOX RGB DUAL 2 SETTINGSmenu of the frontend.
You can of course combine configurations. The state of the three dipswitches is also shown read-only in the menu, under the DIP SWITCHES header.
¶ Summary of the different signals/frequencies
The Recalbox RGB DUAL 2 is versatile and can generate many different video signals. Here is a brief summary:
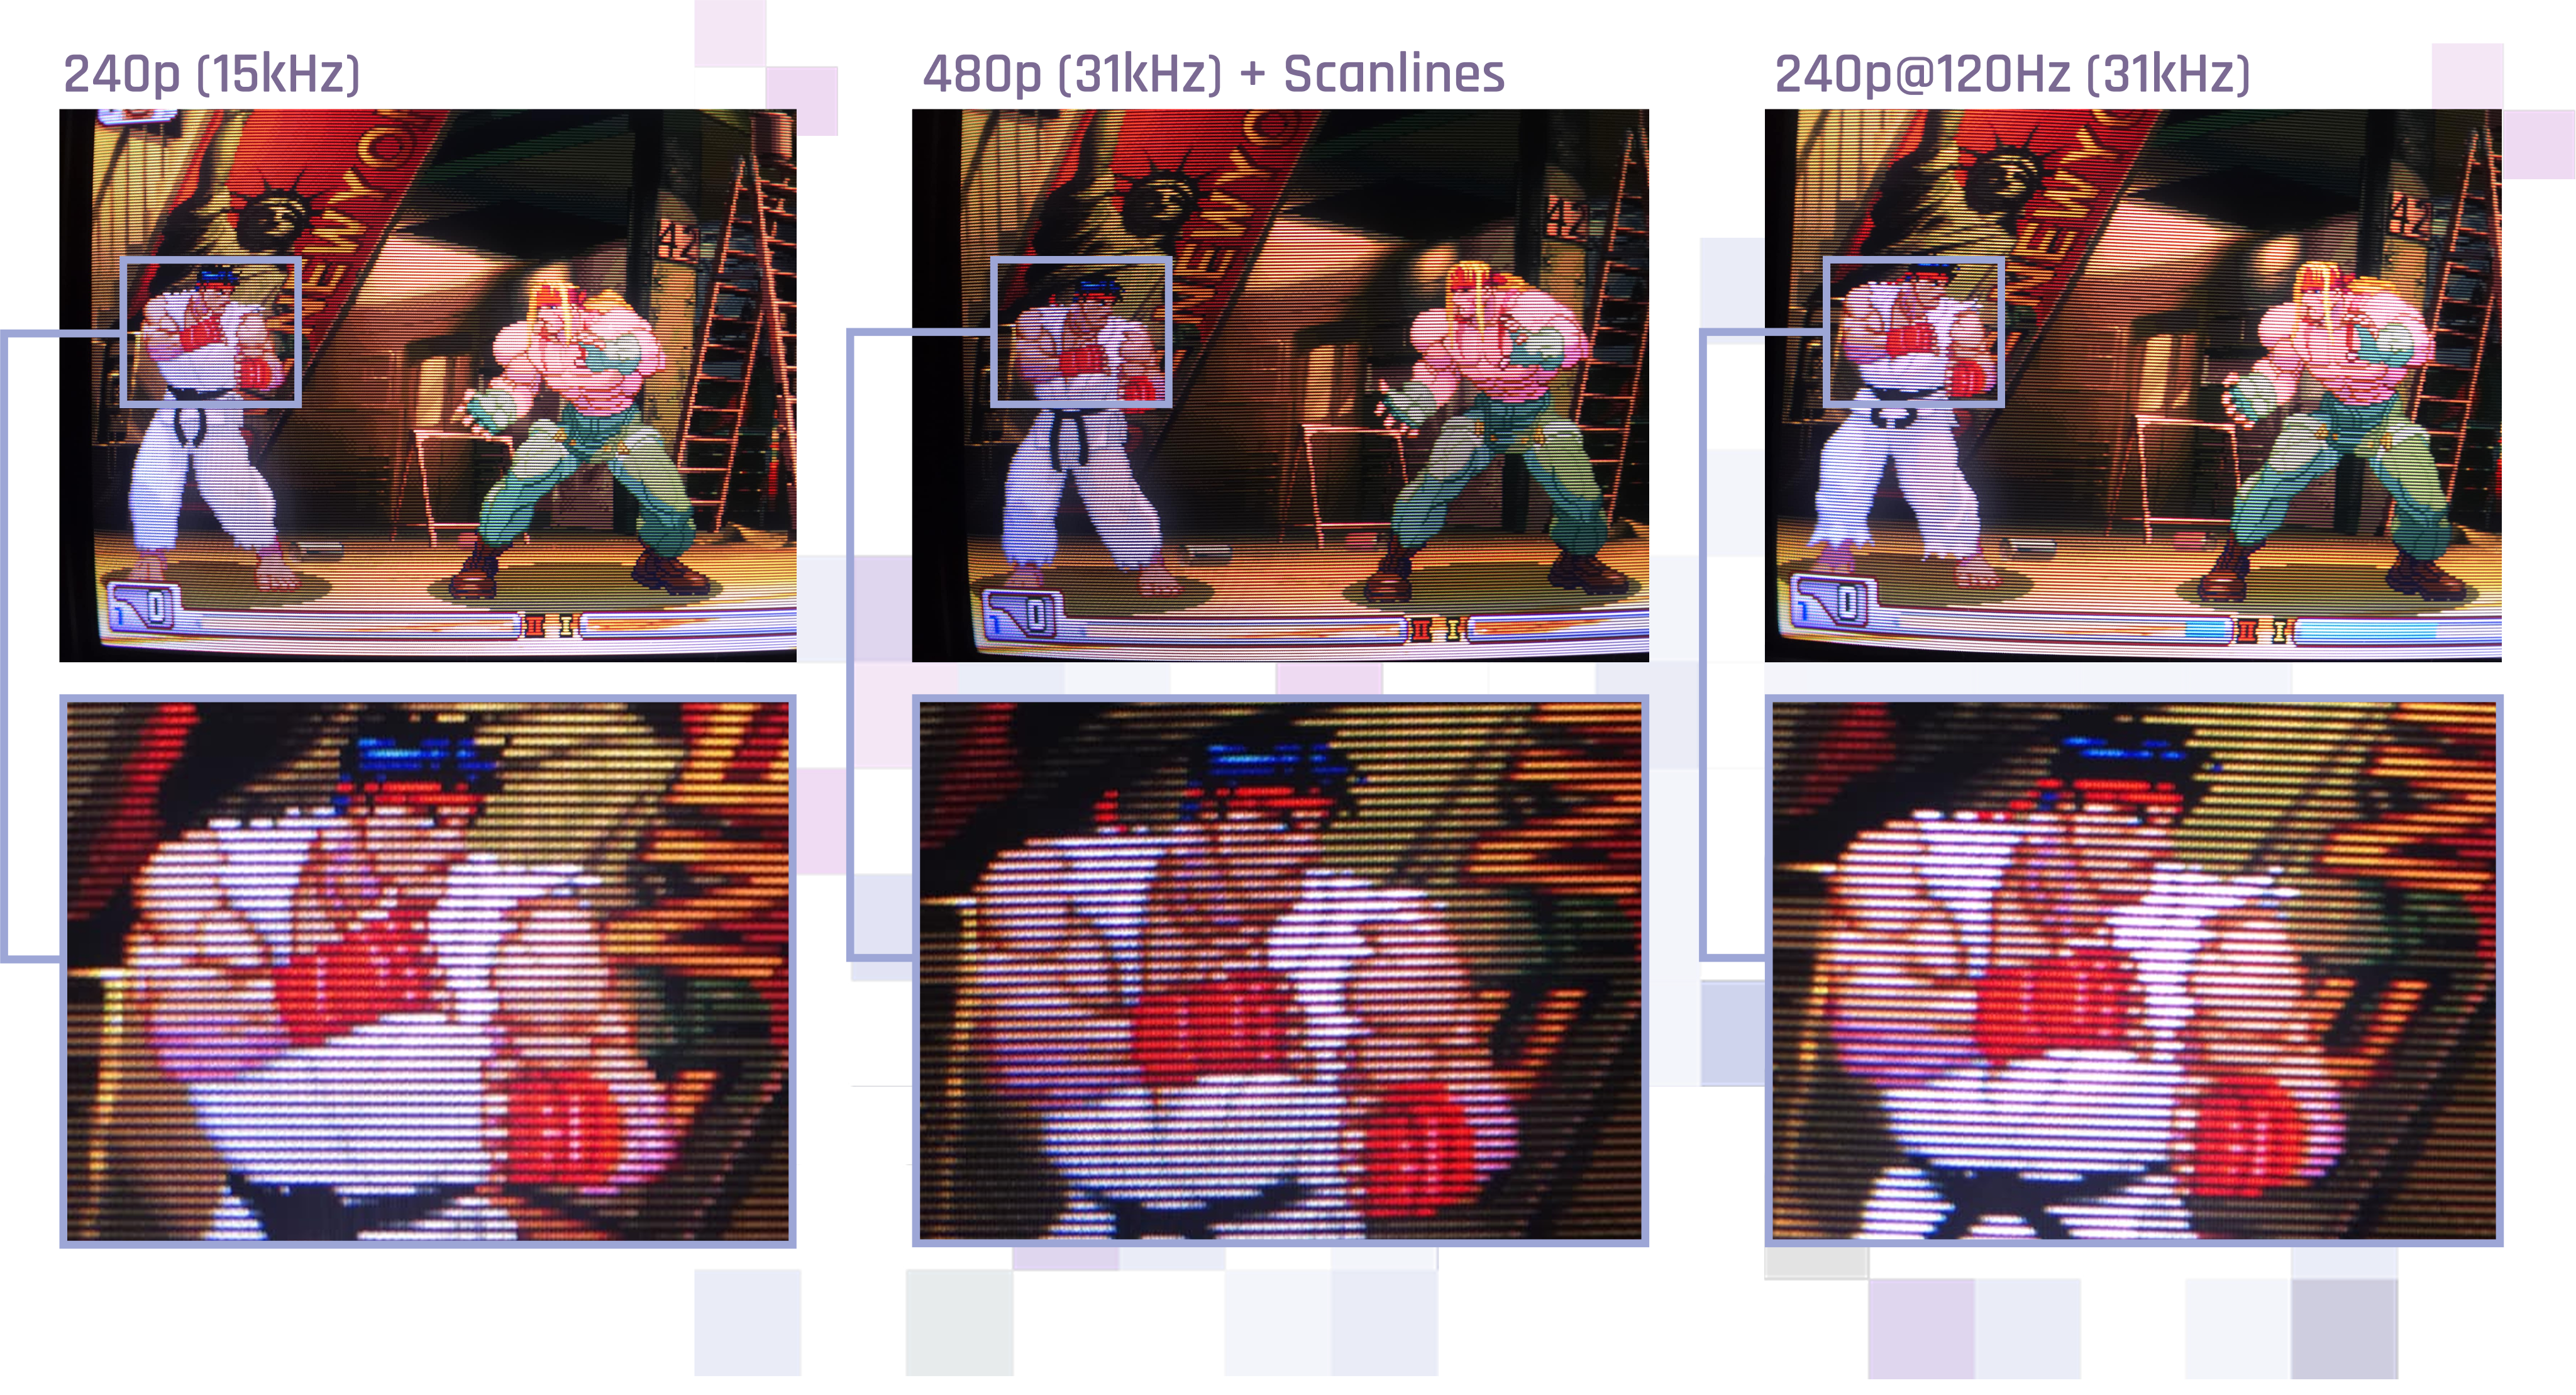
- 15 kHz: this is the horizontal refresh rate of your TVs. 100% of living room TVs support 15 kHz, it is THE standard. Allows the following modes:
- 240p: the most commonly used vertical resolution in video games. It displays 240 lines per frame, progressively, at 60 frames per second. The term "240p" is used for all resolutions close to it (224p, 256p, etc.).
- 480i: vertical resolution of 480-pixel games on TVs. 480i displays 240 lines per frame, but with even lines on one frame and odd lines on the next. This is called interlacing.
- 31 kHz: this is the horizontal refresh rate of your VGA monitors. 100% of VGA PC monitors support 31 kHz. Allows the following modes:
- 480p: displays 480 lines per frame; this is the most sought-after mode for 480-line games (Dreamcast, Naomi, Atomiswave).
- 480p with scanlines: displays 240-line games in 480p by placing a black line between each line of the game display.
- 240p@120Hz: displays 240 lines 120 times per second. Allows 31 kHz screens to display a game natively in 240 lines per frame, resulting in beautiful scanlines.
- 24 kHz: this is the horizontal refresh rate supported by 24 kHz cabinets. The MS8 and MS9 Astro City monitors support 24 kHz in addition to 15 kHz.
- 384p: displays 384 lines per frame progressively; this resolution was only used by a small number of games.
¶ Selecting your screen type and resolution
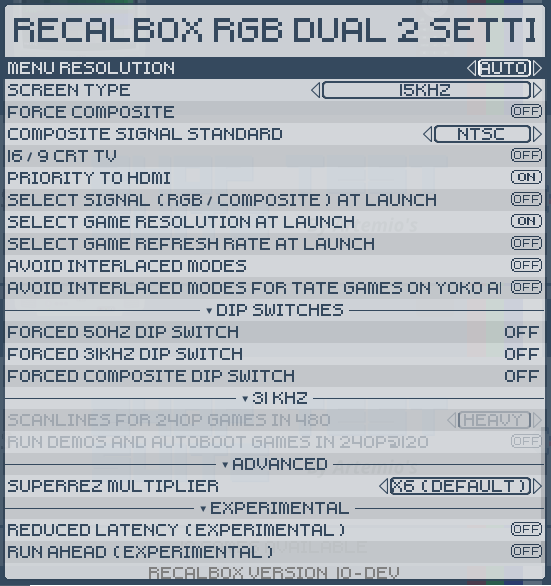
When you unlock 31 kHz / multisync, you can pick the display modes compatible with your screen from the menu, via the SCREEN TYPE option.
Only change these options if you know your screen. And if you are wondering "maybe my TV supports 31 kHz", the answer is no

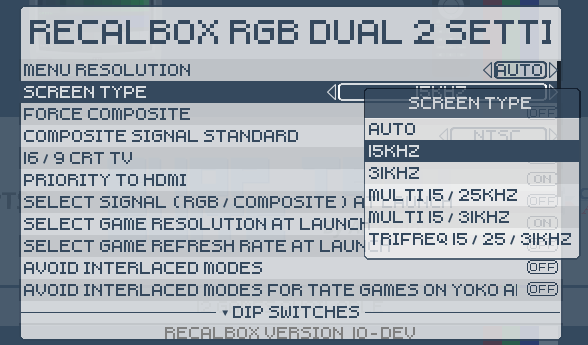
For example, if you switch to 15/31 kHz, 15 kHz games launch at 15 kHz, 31 kHz games launch at 31 kHz, and you can choose the menu (frontend) resolution to your taste with MENU RESOLUTION.
¶ Calibration
To calibrate your CRT screen, several options are available:
- adjusting the screen position for the Recalbox menu and so-called "standalone" emulators (non-Retroarch), in the
RECALBOX RGB DUAL 2 SETTINGSmenu; - adjusting the position and width of the image per game, per emulator or globally in Retroarch, for Libretro emulators only;
- precisely adjusting the geometry of your screen on the OSD (for 31 kHz CRTs) or the service menu (for 15 kHz CRTs), if your CRT has them.
¶ CRT calibration through the Recalbox menu
This calibration only applies to the Recalbox menu and so-called "standalone" emulators that do not use Retroarch.
- Access the Recalbox menu by pressing
START, then selectRECALBOX RGB DUAL SETTINGSorRECALBOX RGB DUAL 2 SETTINGSdepending on your model. - Select the
FRONTEND SCREEN CALIBRATIONoption to access the calibration of your CRT screen. - Select the frequency between "60Hz + 50Hz", "60Hz" or "50Hz" depending on your CRT.
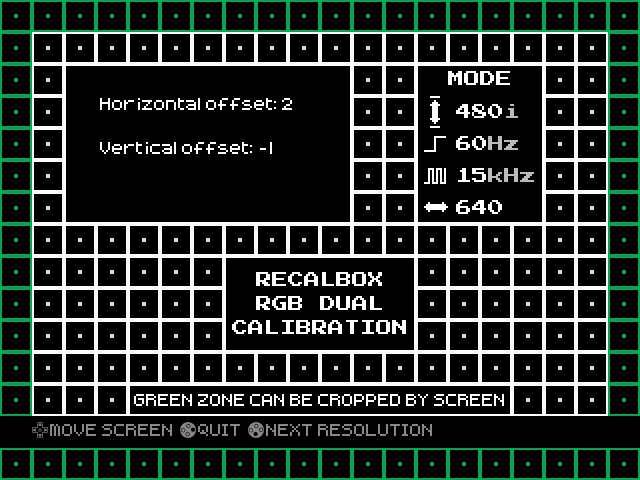
- For each screen corresponding to a specific resolution/frequency, calibrate your screen with the
D-PAD, bearing in mind that the green frame may be cropped on your screen. The most important thing is that the white area is fully visible and centred on your CRT. Once calibration is done, pressBto move on to the next resolution/frequency, until the calibration is complete.
¶ CRT calibration via Retroarch
You must use a "Libretro" emulator to access the Retroarch menu. This guide will not work with so-called "standalone" emulators.
CRT calibration via Retroarch only works in RGB mode. It does not work in composite mode: the screen position stays fixed regardless of the settings selected in this menu.
- Run your game, then use the
HOTKEY+Bshortcut on your controller to access the Retroarch menu and select the "CRT Calibration" menu (in "Quick Menu").
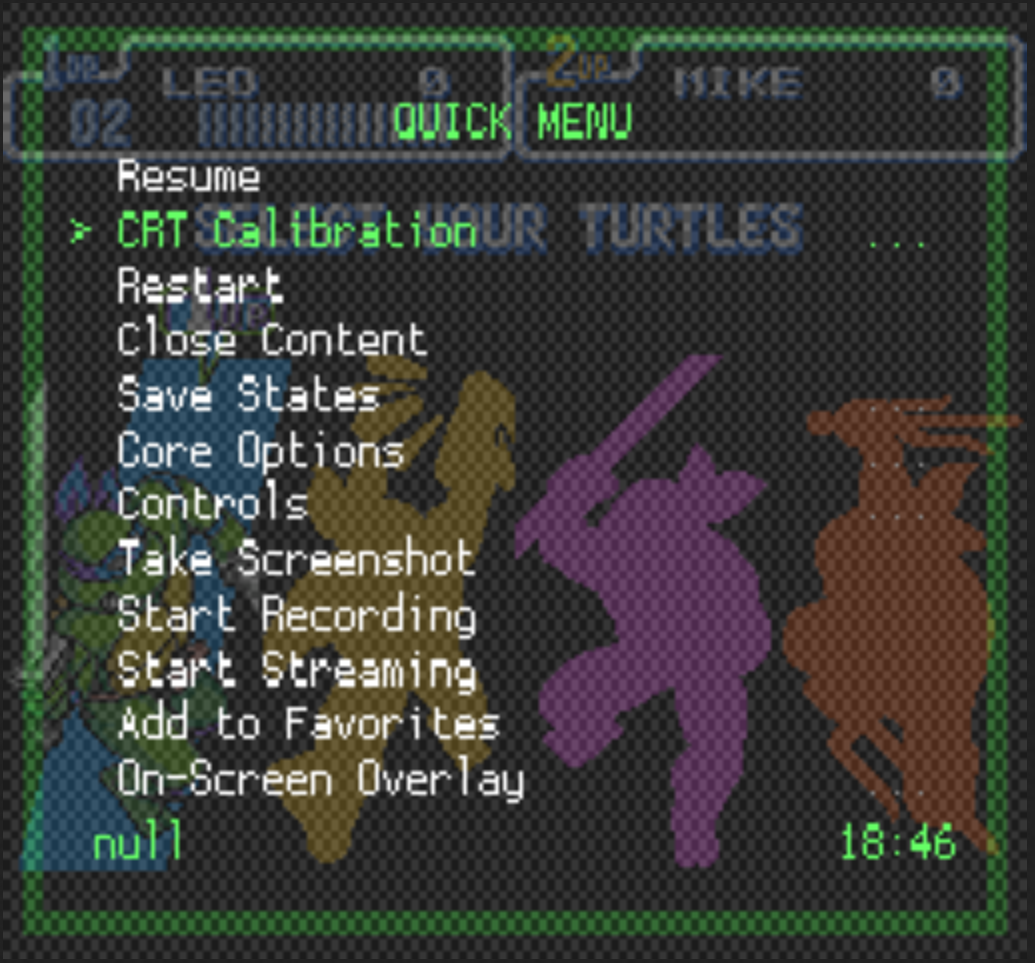
- In this menu, you have several functions:
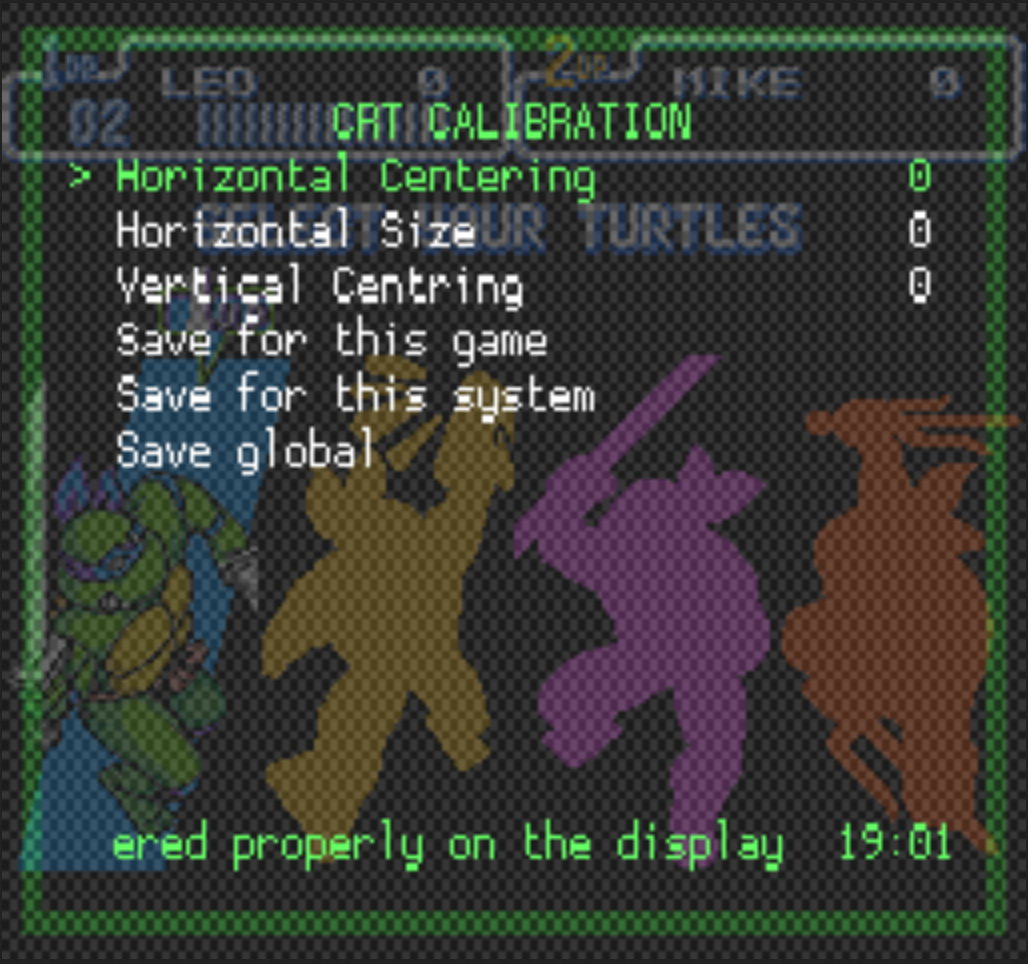
- Horizontal Centering: positions the game screen horizontally.
- Horizontal Size: changes the width of the image.
- Vertical Centering: positions the game screen vertically.
These settings can be changed with the LEFT and RIGHT buttons on your controller/stick. It is not possible to change the height of the image; this setting can only be adjusted directly on your screen.
- Save for this game: saves the settings for the game being played.
- Save for this system: saves the settings for all games on the console using this core.
- Save global: saves the settings for all of Retroarch, regardless of the emulator used.
Press B to confirm the save. Once configured, you can return to your game by using the HOTKEY + B shortcut again.
¶ Interlacing options
You can disable interlaced modes with the AVOID INTERLACED MODES option in the menu. This prevents all interlaced modes.
Some games with a native resolution that is incompatible with your CRT may be displayed interlaced to get as close as possible to the original rendering. You can disable interlacing for these games with the AVOID INTERLACED MODES FOR TATE GAMES ON YOKO AND HANDHELDS option. These games are TATE (vertical) games on a YOKO (horizontal) screen, and games from handheld consoles.

¶ Options when launching games
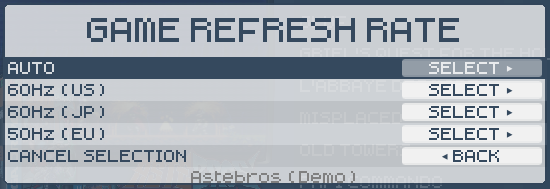
Choice of display frequency when starting a game (SELECT GAME REFRESH RATE AT LAUNCH) — lets you choose the frequency when starting a game, for example to launch a PAL game at 60 Hz, on compatible systems.
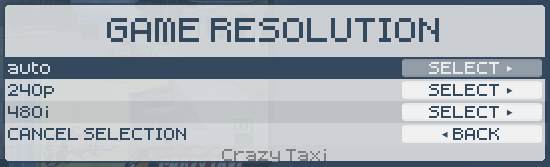
Choice of resolution when starting a game (SELECT GAME RESOLUTION AT LAUNCH) — this menu only offers resolutions compatible with your screen configuration and the resolution of the selected game.
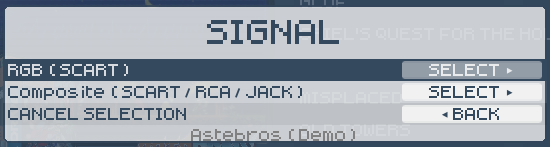
Choice of RGB/composite signal when starting a game (SELECT SIGNAL (RGB/COMPOSITE) AT LAUNCH) — lets you launch the game in RGB or composite, only when using SCART.
¶ Set your GameCube games to 60 Hz
Just like on the original Nintendo GameCube console, it was possible to force a game's frequency to 60 Hz by holding down the B button on the controller when starting the console.
This rule also applies on Recalbox: once a game has started, hold down the B button while the GameCube boots.
Not all games can be forced to 60 Hz using this method. Each game needs to be tested individually.
¶ 16:9 TV
If you have a 16:9 TV, simply enable the 16/9 CRT TV option in the Recalbox RGB DUAL 2 menu. 4:3 games launch in 4:3, and 16:9-compatible games launch in 16:9.

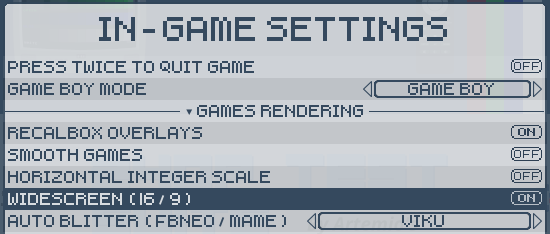
If you want to take advantage of Recalbox's 16:9 hacks for compatible systems (SNES, Mega Drive, Dreamcast), you can enable widescreen mode in the game options:
¶ Guncon
Guncon support on the Recalbox RGB DUAL 2 is under development.
¶ Summary of options
¶ Where to get a Recalbox RGB DUAL 2
- The bare PCB: Recalbox RGB DUAL 2 — PCB
- The whole range (kits, cases, cables): RGB DUAL category
¶ FAQ
- What type of jack to RCA cable is compatible?
For any other question, join the Recalbox Discord server.