On Raspberry Pi, you can control Kodi with almost any infrared remote, for a few euros of hardware. This feature is for Kodi only (not EmulationStation nor games).
Before pulling out the soldering iron: if your TV supports HDMI CEC, its remote already controls Kodi with nothing to install. The Kore or Yatse smartphone apps are also hardware-free alternatives.
This setup requires editing system files over SSH and has not yet been re-validated end to end on Recalbox 10.1. If you get stuck, ask for help on the Recalbox Discord.
¶ I - The hardware
¶ A - An infrared receiver
You need a 38 kHz IR receiver, for instance a TSOP4838 module (about 1 €, from any electronics store). It comes either as a bare three-legged component topped with a small bulging black lens, or as a module already mounted on a small board. On a module the three pins are silk-screened (VCC or +, GND or −, OUT or S); on a bare TSOP4838 the legs are, with the bulging lens facing you, OUT, GND then VCC from left to right.
¶ B - Three female/female dupont wires
To connect the receiver to the Raspberry Pi GPIO pins without soldering: one wire per receiver pin, with a female connector at each end.
¶ C - The wiring
Connect the three pins of the receiver to the Raspberry Pi:
| Receiver pin | Raspberry Pi pin |
|---|---|
| VCC | 3.3 V |
| GND | Ground (GND) |
| OUT (signal) | GPIO 18 |
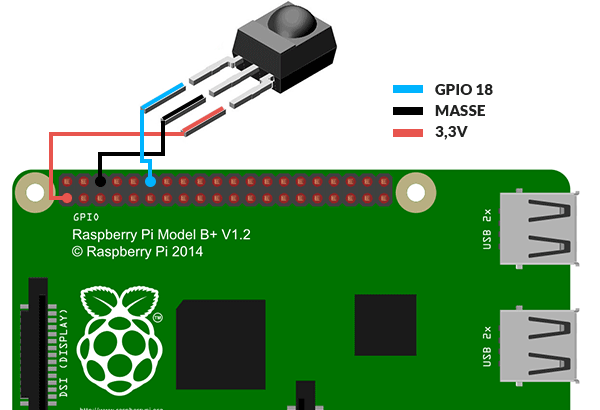
GPIO 18 is the pin Recalbox uses by default. You can pick another one, as long as you declare it in the configuration (see below).
¶ D - The remote
Almost any standard infrared remote works: TV remote, hi-fi remote, universal remote, computer remote…
¶ II - Enabling the receiver
¶ A - Enable the infrared service
In the /recalbox/share/system/recalbox.conf file, set the following key to 1 (section D5 - Infrared controllers):
lircd.enabled=1
¶ B - Enable the receiver in the firmware
-
Connect to your Recalbox over SSH.
-
Remount the boot partition read-write:
mount -o remount,rw /boot -
Edit the
/boot/recalbox-user-config.txtfile and add the line:dtoverlay=gpio-irIf you wired the signal to a pin other than GPIO 18, declare it:
dtoverlay=gpio-ir,gpio_pin=23.
The file still contains a commented
#dtoverlay=lirc-rpiline inherited from older versions: do not use it, this overlay no longer exists in the Recalbox 10.1 kernel.gpio-iris its replacement.
- Reboot your Recalbox.
¶ C - Check that the receiver works
- Over SSH, check that the device exists:
ls /dev/lirc0
- Then run:
mode2 -d /dev/lirc0
- Press keys on your remote in front of the receiver: lines of numbers (
pulse/space) should scroll by. If they do, the hardware works. - Quit with
Ctrl+C.
¶ III - Recording your remote
¶ A - Start the recording
- Run:
irrecord -d /dev/lirc0 /recalbox/share/custom.conf
- Follow the instructions (press
Enterto start). - When asked for the remote's name, enter exactly
customremote: this is the name expected by the Kodi configuration shipped with Recalbox.
¶ B - Map the keys
For each key you want to use, type its standard name then press the matching button on the remote. The essential names:
- KEY_UP, KEY_DOWN, KEY_LEFT, KEY_RIGHT
- KEY_OK (Select)
- KEY_EXIT (Back/Exit)
- KEY_MENU (Menu)
- KEY_PLAY (Play/Pause), KEY_STOP (Stop)
- KEY_INFO (Info about the playing media)
- KEY_VOLUMEUP / KEY_VOLUMEDOWN (Volume), KEY_MUTE (Mute)
- KEY_POWER (Exit)
And if your remote has enough buttons: KEY_PAUSE, KEY_FASTFORWARD, KEY_REWIND, KEY_NEXT, KEY_PREVIOUS, KEY_RECORD, KEY_CHANNELUP, KEY_CHANNELDOWN, KEY_SUBTITLE, KEY_LANGUAGE, KEY_EPG, KEY_ENTER, KEY_DELETE, KEY_NUMERIC_0 to KEY_NUMERIC_9, the color keys (KEY_RED, KEY_GREEN, KEY_YELLOW, KEY_BLUE), KEY_AUDIO, KEY_VIDEO, KEY_MEDIA, KEY_RADIO, KEY_PVR, KEY_ZOOM.
- To redo a key, type its name again and start over.
- When you are done, press
Enter, then follow the last stepirrecordasks for (quick repeated presses on a single key). - To start from scratch, delete the file (
rm /recalbox/share/custom.conf) and runirrecordagain.
¶ C - Install the configuration
- Replace the
lircdconfiguration file with yours:
mv /recalbox/share/custom.conf /recalbox/share/system/.config/lirc/lircd.conf
- Restart the service:
/etc/init.d/S25lircd restart
¶ D - Check
- Type
irw: every press on the remote should print a line with the key name. Quit withCtrl+C. - Launch Kodi and test the navigation.
¶ IV - Advanced configuration
¶ A - Lircmap.xml
The remote key → Kodi button mapping is defined in /recalbox/share/system/.kodi/userdata/Lircmap.xml (shipped by Recalbox for the customremote remote). You can edit it to change the mapping; the original template remains available in /recalbox/share_init/system/.kodi/userdata/Lircmap.xml.
¶ B - Custom keymaps
To go further (change a button's action, CEC remotes…), create a keymap file in /recalbox/share/system/.kodi/userdata/keymaps/ following the Kodi wiki documentation. No keymap is shipped by default: this folder is yours.